Simulation and Provided Code#
Simulation Setup#
This project uses the final project world (final_project.sdf)
from husarion_gz_worlds and the differential-drive rosbot. The
world is a 12 m x 10 m disaster zone with four rooms separated by
walls and doorways. Four color-coded floor markers indicate the search
zones, and a white marker with a red cross marks the base station at
the origin. Debris obstacles are scattered inside the rooms.
Important
The floor markers are visual-only (no collision geometry). The robot does not use them for perception. They exist purely as a visual cue for you and the instructor to confirm the zone poses at a glance.
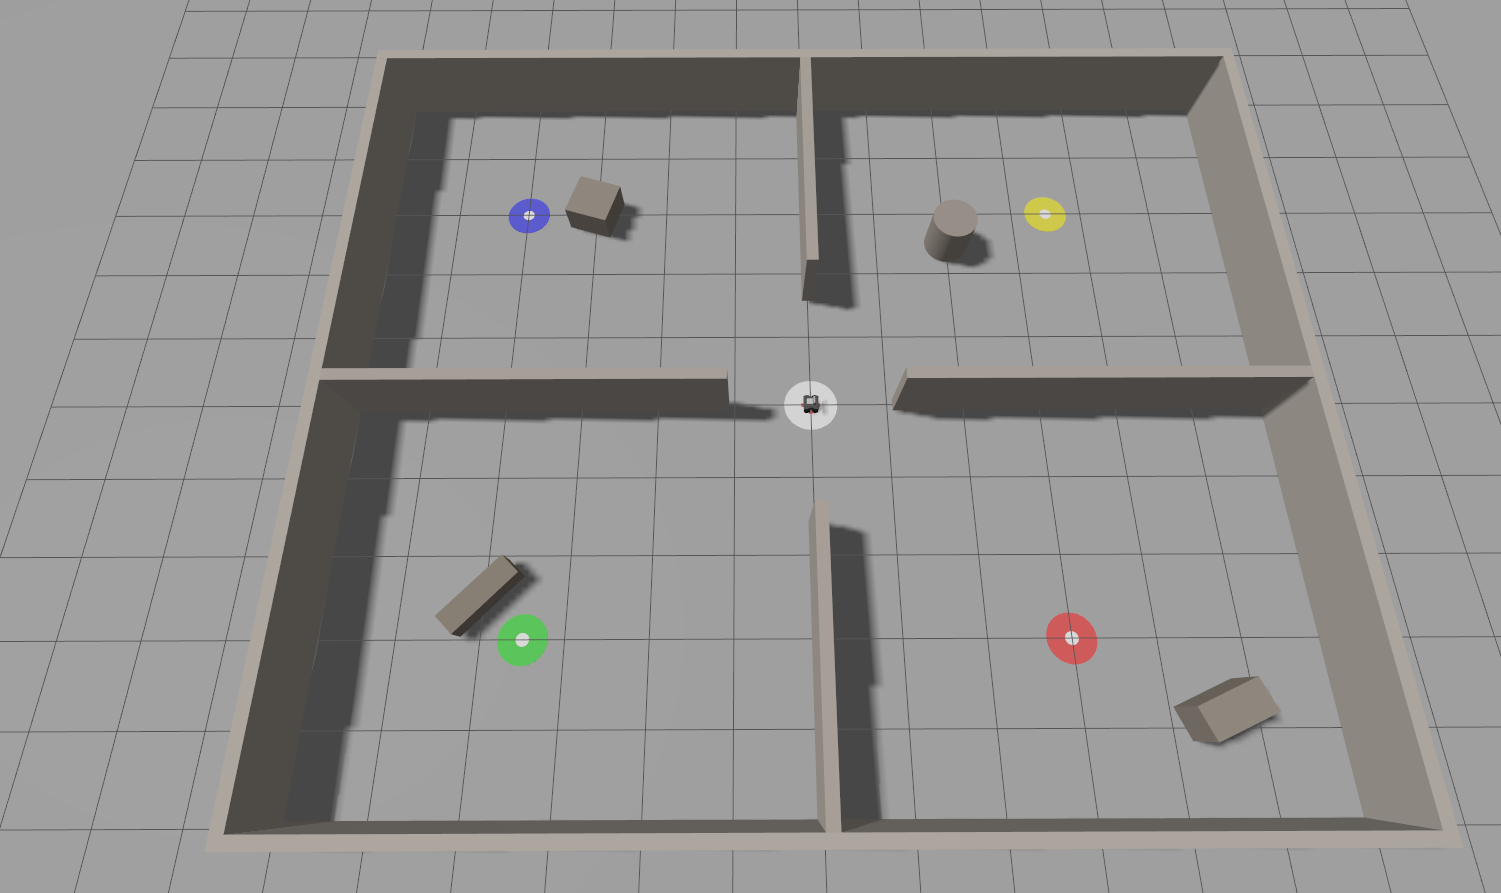
Fig. 124 Simulation environment for the Final Project.#
Fig. 125 Simulation environment for the Final Project.#
You will use Nav2 for autonomous navigation, which requires a
pre-built occupancy grid map. Each group must build their own map
of the final project world using slam_toolbox and save it with
nav2_map_server. No map is provided. The full map-building
procedure is documented in Build the Map under
Requirements.
Build and Launch#
Follow these steps from a terminal opened in ~/enpm605_ws.
1. Pull the latest code.
cd ~/enpm605_ws && git pull
2. Install system dependencies.
sudo apt update && rosdep install --from-paths src --ignore-src -y \
    --skip-keys "micro_ros_agent python3-ftdi"
3. Build the full stack.
Important
Edit ~/enpm605_ws/src/final_project_meta/package.xml
before your first full build:
Replace the three placeholder
<maintainer>tags with your group members’ names and UMD emails. If your group has 2 members, delete the extra slot.Uncomment the two
<exec_depend>lines near the bottom, replacingNwith your group number:<exec_depend>groupN_final_interfaces</exec_depend> <exec_depend>groupN_final</exec_depend>
Without the <exec_depend> edits, colcon build
--packages-up-to final_project_meta will build the simulation
stack but skip your own code.
colcon build --symlink-install \
    --cmake-args -DCMAKE_BUILD_TYPE=Release \
    --packages-up-to final_project_meta
4. Source the workspace.
source ~/enpm605_ws/install/setup.bash
5. Launch the simulation.
ros2 launch rosbot_gazebo final_project_world.launch.py
The rosbot starts at the origin (0, 0, 0) with yaw 0. You
should see the four color-coded zone markers (red, green, blue,
yellow) in the four rooms and a white base station marker with a
red cross at the center.
6. Launch the search and rescue mission (in a second terminal):
ros2 launch group<N>_final search_and_rescue.launch.py
Your search_and_rescue.launch.py is the single entry point for
the mission: it must bring up Nav2 (localization + navigation stack)
and start your behavior tree node. Do not invoke
map_nav.launch.py directly, and do not ask me (the grader) to run
two launch files in parallel.
Instead, reuse the relevant portions of the reference launch file
inside your own search_and_rescue.launch.py:
Reference: map_nav.launch.py
A typical structure looks like:
import os

from ament_index_python.packages import get_package_share_directory
from launch import LaunchDescription
from launch.actions import DeclareLaunchArgument, IncludeLaunchDescription
from launch.conditions import IfCondition
from launch.launch_description_sources import PythonLaunchDescriptionSource
from launch.substitutions import LaunchConfiguration
from launch_ros.actions import Node


def generate_launch_description():
    pkg_share = get_package_share_directory('group<N>_final')
    map_file = os.path.join(pkg_share, 'maps', 'final_project_map.yaml')
    nav2_params = os.path.join(pkg_share, 'config', 'nav2_params.yaml')
    mission_params = os.path.join(pkg_share, 'config', 'mission_params.yaml')
    rviz_config = os.path.join(pkg_share, 'rviz', 'nav2.rviz')

    rviz_arg = DeclareLaunchArgument(
        'rviz', default_value='true',
        description="Start RViz with the package's nav2 view.",
    )

    # --- Nav2 bringup, adapted from map_nav.launch.py ---
    # Pass launch_arguments as a list of tuples (NOT dict.items())
    # so each value's static type is narrowed independently.
    nav2_bringup = IncludeLaunchDescription(
        PythonLaunchDescriptionSource(...),  # nav2_bringup launch
        launch_arguments=[
            ('map', map_file),
            ('params_file', nav2_params),
            ('use_sim_time', 'true'),
            ('autostart', 'true'),
        ],
    )

    # --- behaviour tree entry point ---
    bt_node = Node(
        package='group<N>_final',
        executable='search_and_rescue_exe',     # registered in setup.py
        name='search_and_rescue',
        output='screen',
        emulate_tty=True,
        parameters=[mission_params],
    )

    # --- simulated service servers ---
    detect_server = Node(
        package='group<N>_final',
        executable='detect_survivor_server_exe',
        name='detect_survivor_server',
        output='screen',
        emulate_tty=True,
    )
    report_server = Node(
        package='group<N>_final',
        executable='report_survivor_server_exe',
        name='report_survivor_server',
        output='screen',
        emulate_tty=True,
    )

    # --- RViz (optional, gated on a launch arg) ---
    rviz_node = Node(
        package='rviz2',
        executable='rviz2',
        name='rviz2',
        arguments=['-d', rviz_config],
        output='screen',
        emulate_tty=True,
        condition=IfCondition(LaunchConfiguration('rviz')),
    )

    return LaunchDescription([
        rviz_arg,
        nav2_bringup,
        rviz_node,
        detect_server,
        report_server,
        bt_node,
    ])
Important
final_project_map.yaml is the file you produce in the
Build the Map step. Make sure both the
.yaml and its companion .pgm are installed by your
package (add the maps/ directory to data_files in
setup.py), otherwise get_package_share_directory() will
not find them at runtime.
Note
The mission_params.yaml schema (zones, base station, tick
rate) is documented in
Parameter File. The behaviour-tree entry
point reads it using the auto-declare pattern described in
Reading Auto-Declared YAML Parameters.
How Detection Works#
This project uses simulated detection – there is no camera or computer vision involved. Survivor detection is implemented entirely as a ROS 2 service call.
The flow:
The robot navigates to a search zone using Nav2.
Once the robot arrives, the
DetectSurvivorBT action node calls thedetect_survivorservice, passing the current zone ID (e.g.,"zone_a").The
DetectSurvivorServer(a separate node you write) maintains a hardcoded dictionary mapping zone IDs to survivor locations. If the zone has a survivor, it returnsfound=Truewith the survivor’s(x, y)coordinates. Otherwise it returnsfound=False.If a survivor is found, the
BroadcastSurvivorTFBT action usestf2_ros.StaticTransformBroadcasterto publish a static TF frame (e.g.,survivor_1) at the reported coordinates, relative to themapframe.
Note
The detection service is a simple dictionary lookup – it does not check whether the robot is physically near the zone. You could call the service manually from any location:
ros2 service call /detect_survivor \
    group<N>_final_interfaces/srv/DetectSurvivor \
    "{zone_id: 'zone_a'}"
and receive found=True regardless of the robot’s position.
This is intentional: the service is a simulation stand-in for a
real perception system. The behavior tree enforces the correct
sequencing – the DetectSurvivor node is only ticked
after NavigateToZone succeeds within the Patrol Sequence,
so the robot must physically reach the zone before detection runs.
Zone Layout#
The four search zones and the base station are positioned as follows:
Zone |
X (m) |
Y (m) |
Color |
Room |
|---|---|---|---|---|
|
-3.0 |
3.0 |
Red |
Northwest |
|
3.5 |
3.0 |
Green |
Northeast |
|
4.0 |
-3.0 |
Blue |
Southeast |
|
-3.5 |
-3.0 |
Yellow |
Southwest |
Base |
0.0 |
0.0 |
White + red cross |
Center (origin) |
The simulated detection server should be configured so that
zones A and C contain survivors and zones B and D do not.
You are free to change the survivor locations, but your submitted
DetectSurvivorServer must have at least two zones with
survivors.
Interfaces and Frames#
Actions and Services You Will Use
Role |
Kind |
Name / Type |
Description |
|---|---|---|---|
Client |
Action |
|
Nav2 action for autonomous navigation to a goal pose. |
Client |
Service |
|
Simulated survivor detection at a zone (you implement the server). |
Client |
Service |
|
Report a found survivor to the simulated command center (you implement the server). |
TF Frames
Frame |
Description |
|---|---|
|
The global fixed frame. All zone coordinates and survivor positions are expressed in this frame. |
|
The odometry frame, child of |
|
The robot’s body frame. |
|
Static frames broadcast by your BT when survivors are
found. Each is a child of |
Provided Reference Code#
The following packages from the lecture series are relevant reference material. You will not submit or depend on them directly.
Reference Files to Study
File |
What to learn from it |
|---|---|
Primary Nav2 reference. Shows how to use
|
|
Entry point pattern: creating the node with a
|
|
Launch file that starts Nav2 localization, navigation
stack, RViz, and an optional demo node with
|
|
Nav2 parameter configuration. Note the
|
|
Custom BT action node pattern: |
|
Custom BT condition node pattern: subscribes to a topic
in |
|
Entry point that reads parameters, builds the BT,
wraps it in |
|
Launch file with |
|
Template for a CMake package that generates service
interfaces via |
|
Loading a YAML parameter file in a launch file using
|
|
TF2 frame broadcasting examples using
|
Starter Packages#
Your workspace contains two directories for this project (both ship in the course repo under src/):
final_project/ (cloned to
~/enpm605_ws/src/final_project/) – empty folder where you create your two packages (group<N>_final_interfacesandgroup<N>_final).final_project_meta/ (cloned to
~/enpm605_ws/src/final_project_meta/) – metapackage that you edit to register your packages (see above).
The metapackage already includes dependencies on the simulated robot, py_trees,
py_trees_ros, tf2_ros, sensor_msgs, geometry_msgs,
nav_msgs, and nav2_simple_commander.