Simulation and Provided Code#
Simulation Setup#
This assignment uses the GP2 world (gp2.sdf) from
husarion_gz_worlds and the differential-drive rosbot (not
rosbot_xl). The world is otherwise empty, but it contains three
color-coded floor markers at the three goal positions (red, green,
blue) with black arrows pointing in each goal’s final_heading.
The launch file is already installed in your workspace.
Important
The floor markers are visual-only (no collision geometry). The robot does not use them for perception. They exist purely as a visual cue for you and the instructor to confirm the goal poses at a glance.
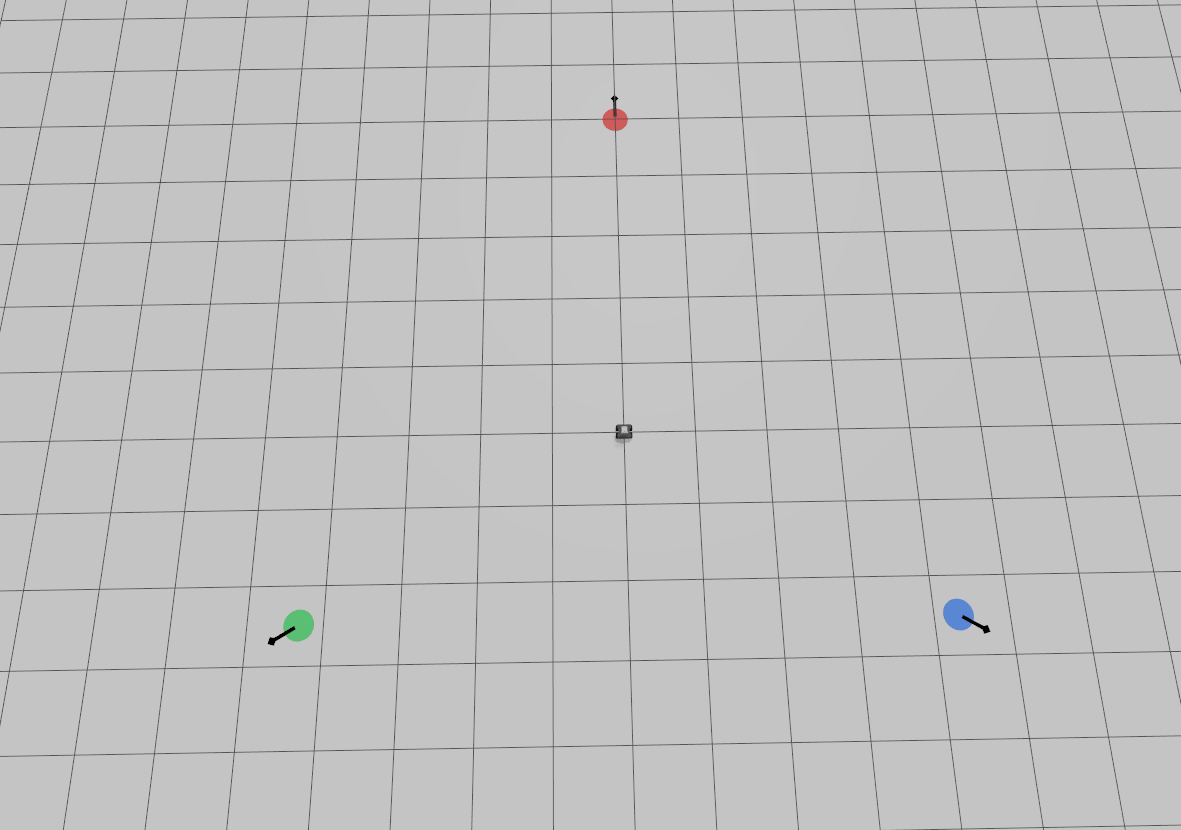
Fig. 122 Simulation environment for GP2.#
Fig. 123 Simulation environment for GP2.#
Build and Launch#
Follow these six steps from a terminal opened in ~/enpm605_ws.
1. Pull the latest code.
cd ~/enpm605_ws && git pull
2. Install system dependencies.
rosdep install --from-paths src --ignore-src -y --skip-keys "micro_ros_agent"
Note
--from-paths srctells rosdep to scan every package undersrc/.--ignore-srcskips dependencies that are satisfied by other packages already in the workspace (so rosdep does not try to apt-install something you have as source).-yauto-confirms apt prompts.--skip-keys "micro_ros_agent"skips the micro-ROS agent key, which is not available on standard apt repositories and is not needed for the GP2 simulation.
3. Remove stale build artifacts. Delete any existing
build/, install/, and log/ directories at the root of
your workspace so the next build starts from a clean slate. Old
artifacts from previous lectures or failed builds are a common
source of confusing errors when the layout changes.
cd ~/enpm605_ws && rm -rf build/ install/ log/
Warning
Only delete these three directories at the workspace root
(~/enpm605_ws/build, ~/enpm605_ws/install,
~/enpm605_ws/log). Do not delete anything under
~/enpm605_ws/src/
4. Build the GP2 stack. --packages-up-to resolves the
dependency graph of the gp2_meta metapackage and builds every
package it needs in the correct order.
colcon build --symlink-install --cmake-args -DCMAKE_BUILD_TYPE=Release --packages-up-to gp2_meta
Note
--symlink-installlinks Python files and installed assets (launch files, world files) back to the source tree, so you can edit a.pyor.sdfwithout re-runningcolcon buildevery time.-DCMAKE_BUILD_TYPE=Releaseenables compiler optimizations, which matters for the simulation’s C++ components.gp2_metais a metapackage (at~/enpm605_ws/src/gp2_meta) that transitively depends onhusarion_gz_worlds,rosbot_gazebo, and the rest of the rosbot_ros stack. Once you have created your two packages, you will register them ingp2_meta/package.xmlso this same command builds your submission too.
Important
Edit ~/enpm605_ws/src/gp2_meta/package.xml before
your first full build:
Replace the three placeholder
<maintainer>tags with your group members’ names and UMD emails. If your group has 2 members instead of 3, delete the extra slot.Uncomment the two
<exec_depend>lines near the bottom, replacingNwith your group number:<exec_depend>groupN_gp2_interfaces</exec_depend> <exec_depend>groupN_gp2</exec_depend>
Without the <exec_depend> edits, colcon build
--packages-up-to gp2_meta will build the simulation stack
but skip your own code. See Requirements for the
full package.xml metadata requirements.
5. Source the workspace. Run this in every new terminal before launching ROS 2 commands.
source ~/enpm605_ws/install/setup.bash
6. Launch the GP2 world.
ros2 launch rosbot_gazebo gp2_world.launch.py
The rosbot starts at the origin (0, 0, 0) with yaw 0. You
should see the three color-coded markers (red, green, blue) arranged
in a triangle around the robot, each with a black arrow pointing in
the goal’s final_heading.
Topics You Will Use
Direction |
Topic / Type |
Description |
|---|---|---|
Subscribe |
|
Robot pose feedback from the EKF. Use it to extract the
current |
Publish |
|
Velocity commands to the differential-drive controller.
Linear |
Provided Reference Code#
The following ROS 2 package is already on your machine at
~/enpm605_ws/src/lecture11/robot_control_demo. You will not
submit or depend on it directly. Instead, you will port the
proportional-controller logic into the execute_callback of your
own action server.
Important
Do not launch robot_control_demo/p_controller alongside your
action server. Both nodes would publish to /cmd_vel and fight
for control of the robot. Your submitted system must be
self-contained: the action server itself subscribes to
/odometry/filtered and publishes to /cmd_vel.
Proportional Controller Reference (p_controller_demo.py)
Read the file at
~/enpm605_ws/src/lecture11/robot_control_demo/robot_control_demo/
p_controller_demo.py
carefully. You will re-use its control logic
inside your action server.
Two-phase control loop (runs at 20 Hz):
Phase 1 (position): while the Euclidean distance
rho = sqrt(dx^2 + dy^2)exceedsgoal_tolerance, drive toward the goal:angle_to_goal = math.atan2(dy, dx) alpha = math.atan2( math.sin(angle_to_goal - yaw), math.cos(angle_to_goal - yaw), ) cmd.twist.linear.x = clip(k_rho * rho, MAX_LINEAR) cmd.twist.angular.z = clip(k_alpha * alpha, MAX_ANGULAR)
Phase 2 (orientation): once within
goal_toleranceof the goal position, rotate in place to reach the desired yaw:yaw_error = math.atan2( math.sin(goal_yaw - yaw), math.cos(goal_yaw - yaw), ) cmd.twist.angular.z = clip(k_yaw * yaw_error, MAX_ANGULAR)
When
abs(yaw_error) < yaw_tolerance, the goal is fully reached (position and orientation).
Constants:
MAX_LINEAR  = 0.5   # m/s
MAX_ANGULAR = 1.0   # rad/s
Suggested gains and tolerances (defaults in the reference):
Parameter |
Default |
Purpose |
|---|---|---|
|
0.4 |
Proportional gain on distance (linear velocity). |
|
0.8 |
Proportional gain on heading error (angular velocity, phase 1). |
|
0.8 |
Proportional gain on yaw error (angular velocity, phase 2). |
|
0.10 |
Distance in meters at which the position goal is reached. |
|
0.05 |
Yaw error in radians at which the orientation goal is reached. |
Quaternion and yaw conversion (use scipy):
from scipy.spatial.transform import Rotation as R

# yaw (rad) from quaternion (x, y, z, w)
yaw = R.from_quat([q.x, q.y, q.z, q.w]).as_euler("xyz")[2]

# quaternion from yaw (rad)
quat = R.from_euler("z", yaw).as_quat()  # [x, y, z, w]
Goals Configuration#
The three goals that your action client must visit are defined in a
YAML parameter file that you must create inside your package at
config/goals.yaml. Use the template below as a starting point.
You are free to tune the values, but your submitted file must
contain exactly three goals named goal1, goal2, and
goal3, each with the fields x, y, and final_heading.
# Three goals for the GP2 action client.
#
# Each goal is a named block with x, y, and final_heading fields.
#
# Coordinates are in the odom frame (meters).
# final_heading is the desired yaw at the goal (radians).
#
# Layout: equilateral triangle of radius 5 m around the origin.
# Vertices at angles 0, 2*pi/3, -2*pi/3. Each final_heading points
# radially outward (away from the origin).

/**:
  ros__parameters:
    goal1:
      x: 5.0
      y: 0.0
      final_heading: 0.0
    goal2:
      x: -2.5
      y: 4.330127
      final_heading: 2.0943951
    goal3:
      x: -2.5
      y: -4.330127
      final_heading: -2.0943951
Important
Load this file in your launch file using the parameters field
of the client Node action. In your client node, access each
field with dot-namespaced parameter names, for example
self.get_parameter("goal1.x"),
self.get_parameter("goal1.y"), and
self.get_parameter("goal1.final_heading") (and likewise for
goal2 and goal3).
Reference Files to Study
Before you write any code, read these files in the lecture packages. You are not submitting any of them; they are study material.
File |
What to learn from it |
|---|---|
|
The two-phase P-controller you will port into your action server. |
|
Skeleton of an |
|
Skeleton of an |
|
Example of a |
|
Template for a CMake package that generates action
interfaces via |
|
Template for loading a YAML parameter file in a launch file. |