Requirements#
Your Tasks#
At a high level, your group must complete the following tasks. Each is spelled out in detail in the sections below.
Create two ROS 2 packages inside the pre-existing
~/enpm605_ws/src/final_project/folder:group<N>_final_interfaces(CMake) containing theDetectSurvivor.srvandReportSurvivor.srvdefinitions.group<N>_final(ament_python) containing the behavior tree nodes, service servers, the entry point script, the launch file, and the parameter YAML.
Register both packages as
<exec_depend>entries in~/enpm605_ws/src/final_project_meta/package.xmlso thatcolcon build --packages-up-to final_project_metapicks them up.Define two custom service interfaces (
DetectSurvivor.srvandReportSurvivor.srv) ingroup<N>_final_interfaces.Implement two simulated service servers that respond to detection and report requests.
Implement a shared
ZoneManagerclass (plain Python, not a BT node) that manages the list of search zones and tracks mission state.Implement 9 behavior tree leaf nodes (2 conditions + 7 actions) using
py_trees.behaviour.Behaviour.Assemble the full behavior tree in an entry point script that reads parameters, builds the tree, and runs it with
py_trees_ros.trees.BehaviourTree.Write the launch file that brings up Nav2 (with your
nav2_params.yamlandfinal_project_map.yaml), starts the two simulated service servers, and starts the behavior tree node, loading mission parameters frommission_params.yaml.Build a map of the final project world using
slam_toolboxand save it undergroup<N>_final/maps/(see Simulation and Provided Code for the procedure). The saved.pgmand.yamlfiles must be included in your submission.Document contributions in
README.md.Submit by zipping the
~/enpm605_ws/src/final_project/folder and uploading it to Canvas.
Package Structure#
Your submission must contain two ROS 2 packages, both placed
inside the pre-existing ~/enpm605_ws/src/final_project/ folder.
Package 1. Service interfaces (CMake):
group<N>_final_interfaces/
|-- srv/
|   |-- DetectSurvivor.srv
|   |-- ReportSurvivor.srv
|-- CMakeLists.txt
|-- package.xml
Package 2. Nodes, BT, and launch (ament_python):
group<N>_final/
|-- group<N>_final/
|   |-- __init__.py
|   |-- zone_manager.py
|   |-- bt_nodes/
|   |   |-- __init__.py
|   |   |-- conditions.py
|   |   |-- actions.py
|   |-- service_servers/
|   |   |-- __init__.py
|   |   |-- detect_survivor_server.py
|   |   |-- report_survivor_server.py
|   |-- scripts/
|       |-- __init__.py
|       |-- main_search_and_rescue.py
|-- launch/
|   |-- search_and_rescue.launch.py
|-- config/
|   |-- mission_params.yaml
|   |-- nav2_params.yaml
|-- maps/
|   |-- final_project_map.pgm
|   |-- final_project_map.yaml
|-- resource/
|   |-- group<N>_final
|-- test/
|-- package.xml
|-- setup.py
|-- setup.cfg
|-- README.md
Walkthrough video: package structure
The video below walks through a working group<N>_final/
and group<N>_final_interfaces/ layout file by file.
Click the play button to start it – the video does not
autoplay.
Build the Map#
Nav2 needs a pre-built occupancy grid to localize the robot. No
map is provided – each group must build their own with
slam_toolbox and save it with nav2_map_server. The two
output files (.pgm + .yaml) live under
group<N>_final/maps/ and ship with your submission.
Important
Build the map yourself by following the same workflow we used in class.
Launch the final project world and
slam_toolboxin mapping mode (in two terminals):
Command |
|
|---|---|
T1 |
|
T2 |
|
Gazebo |
Drive the robot with teleop |
RViz |
Observe the map display |
Save the map under your package’s
maps/directory usingnav2_map_server:mkdir -p ~/enpm605_ws/src/final_project/group<N>_final/maps ros2 run nav2_map_server map_saver_cli \ -f ~/enpm605_ws/src/final_project/group<N>_final/maps/final_project_map
This produces
final_project_map.pgmandfinal_project_map.yaml.
Service Interfaces#
Define two custom services in
group<N>_final_interfaces/srv/.
DetectSurvivor.srv:
# Request
string zone_id
---
# Response
bool found
float64 survivor_x
float64 survivor_y
ReportSurvivor.srv:
# Request
string survivor_id
geometry_msgs/PointStamped location
---
# Response
bool acknowledged
CMake/package configuration (follow the template in
lecture10/custom_interfaces):
CMakeLists.txtmust callrosidl_generate_interfaceson both.srvfiles and depend ongeometry_msgs.package.xmlmust includerosidl_default_generators,rosidl_default_runtime,rosidl_interface_packages, andgeometry_msgsentries.
Simulated Service Servers#
Implement two standalone ROS 2 nodes that act as simulated service servers. These simulate a perception system and a command center.
Important
There is no camera or computer vision in this project.
Detection is entirely simulated via a service call. The
DetectSurvivorServer performs a simple dictionary lookup on
the zone ID string – it does not check whether the robot is
physically near the zone. The behavior tree enforces the
correct sequencing: the DetectSurvivor BT action node is
only ticked after NavigateToZone succeeds within the Patrol
Sequence, so the robot must reach the zone before detection runs.
See Simulation and Provided Code for a full explanation.
DetectSurvivorServer (detect_survivor_server.py):
Advertises a service on
detect_survivorusing theDetectSurvivorinterface.Maintains a hardcoded dictionary mapping zone IDs to survivor locations. For example:
SURVIVORS = {
    "zone_a": (-2.5, 3.2),
    "zone_c": (4.1, -2.5),
}
These coordinates are slight offsets from the zone centers (
zone_aat (-3.0, 3.0) andzone_cat (4.0, -3.0)) so the reported survivor pose is plausibly inside the zone rather than at its exact center.When called, if the
zone_idis in the dictionary, returnsfound=Truewith the survivor’s(x, y)coordinates. Otherwise returnsfound=False.Logs each detection request and result.
ReportSurvivorServer (report_survivor_server.py):
Advertises a service on
report_survivorusing theReportSurvivorinterface.When called, the server simulates a command center: it does not forward the message anywhere – the “report” is simply a ROS 2 log entry. Log at minimum:
the
survivor_id,location.header.frame_id(so it is obvious that the coordinates are in the map frame, not the robot body frame), andlocation.point.xandlocation.point.y.
Returns
acknowledged=True.
Note
The location field uses geometry_msgs/PointStamped –
not a bare Point – specifically so the frame in which the
coordinates are expressed travels with the data. A receiver
that gets a stamped point in "map" can transform it into
any other frame with tf2. By contract, the BT node sends
frame_id = "map"; the server should reject (or at least
warn) if it ever receives a different frame.
ZoneManager#
Implement a plain Python class (not a BT node) at
zone_manager.py that manages the mission state. All BT nodes
that need zone information receive a reference to the same
ZoneManager instance via their constructor.
Required interface:
class ZoneManager:
    def __init__(self, zones: list[dict], base_station: dict):
        """Initialize with zone list and base station pose."""
        ...

    def current_zone(self) -> dict:
        """Return the current zone dict (id, x, y, yaw)."""
        ...

    def has_remaining(self) -> bool:
        """True if there are unvisited zones."""
        ...

    def advance(self) -> None:
        """Move to the next zone."""
        ...

    def base_pose(self) -> dict:
        """Return the base station pose dict (x, y, yaw)."""
        ...

    def next_survivor_id(self) -> str:
        """Return a unique ID like 'survivor_1', 'survivor_2', etc."""
        ...
Behavior Tree#
The full behavior tree must be assembled in
scripts/main_search_and_rescue.py. The entry point must:
Load mission parameters from
mission_params.yaml(see Reading Auto-Declared YAML Parameters for thehas_parameterguard pattern that avoids theParameterAlreadyDeclaredExceptiontrap when reading auto-declared YAML keys).Build the
ZoneManagerand the BT leaves.Auto-seed AMCL with the rosbot’s spawn pose (``x=0, y=0, yaw=0``) using ``BasicNavigator.setInitialPose()`` and block until Nav2 is ACTIVE via ``waitUntilNav2Active()``. See Auto-Seeding AMCL with BasicNavigator for the full snippet. Without this step the BT would tick against an idle Nav2 stack forever, since AMCL never publishes
map -> odomwithout an initial pose.Wrap the assembled tree in
py_trees_ros.trees.BehaviourTreeand calltick_tock(period_ms=...).Spin until shutdown.
The static structure of the tree (composites, conditions, actions) is shown below.
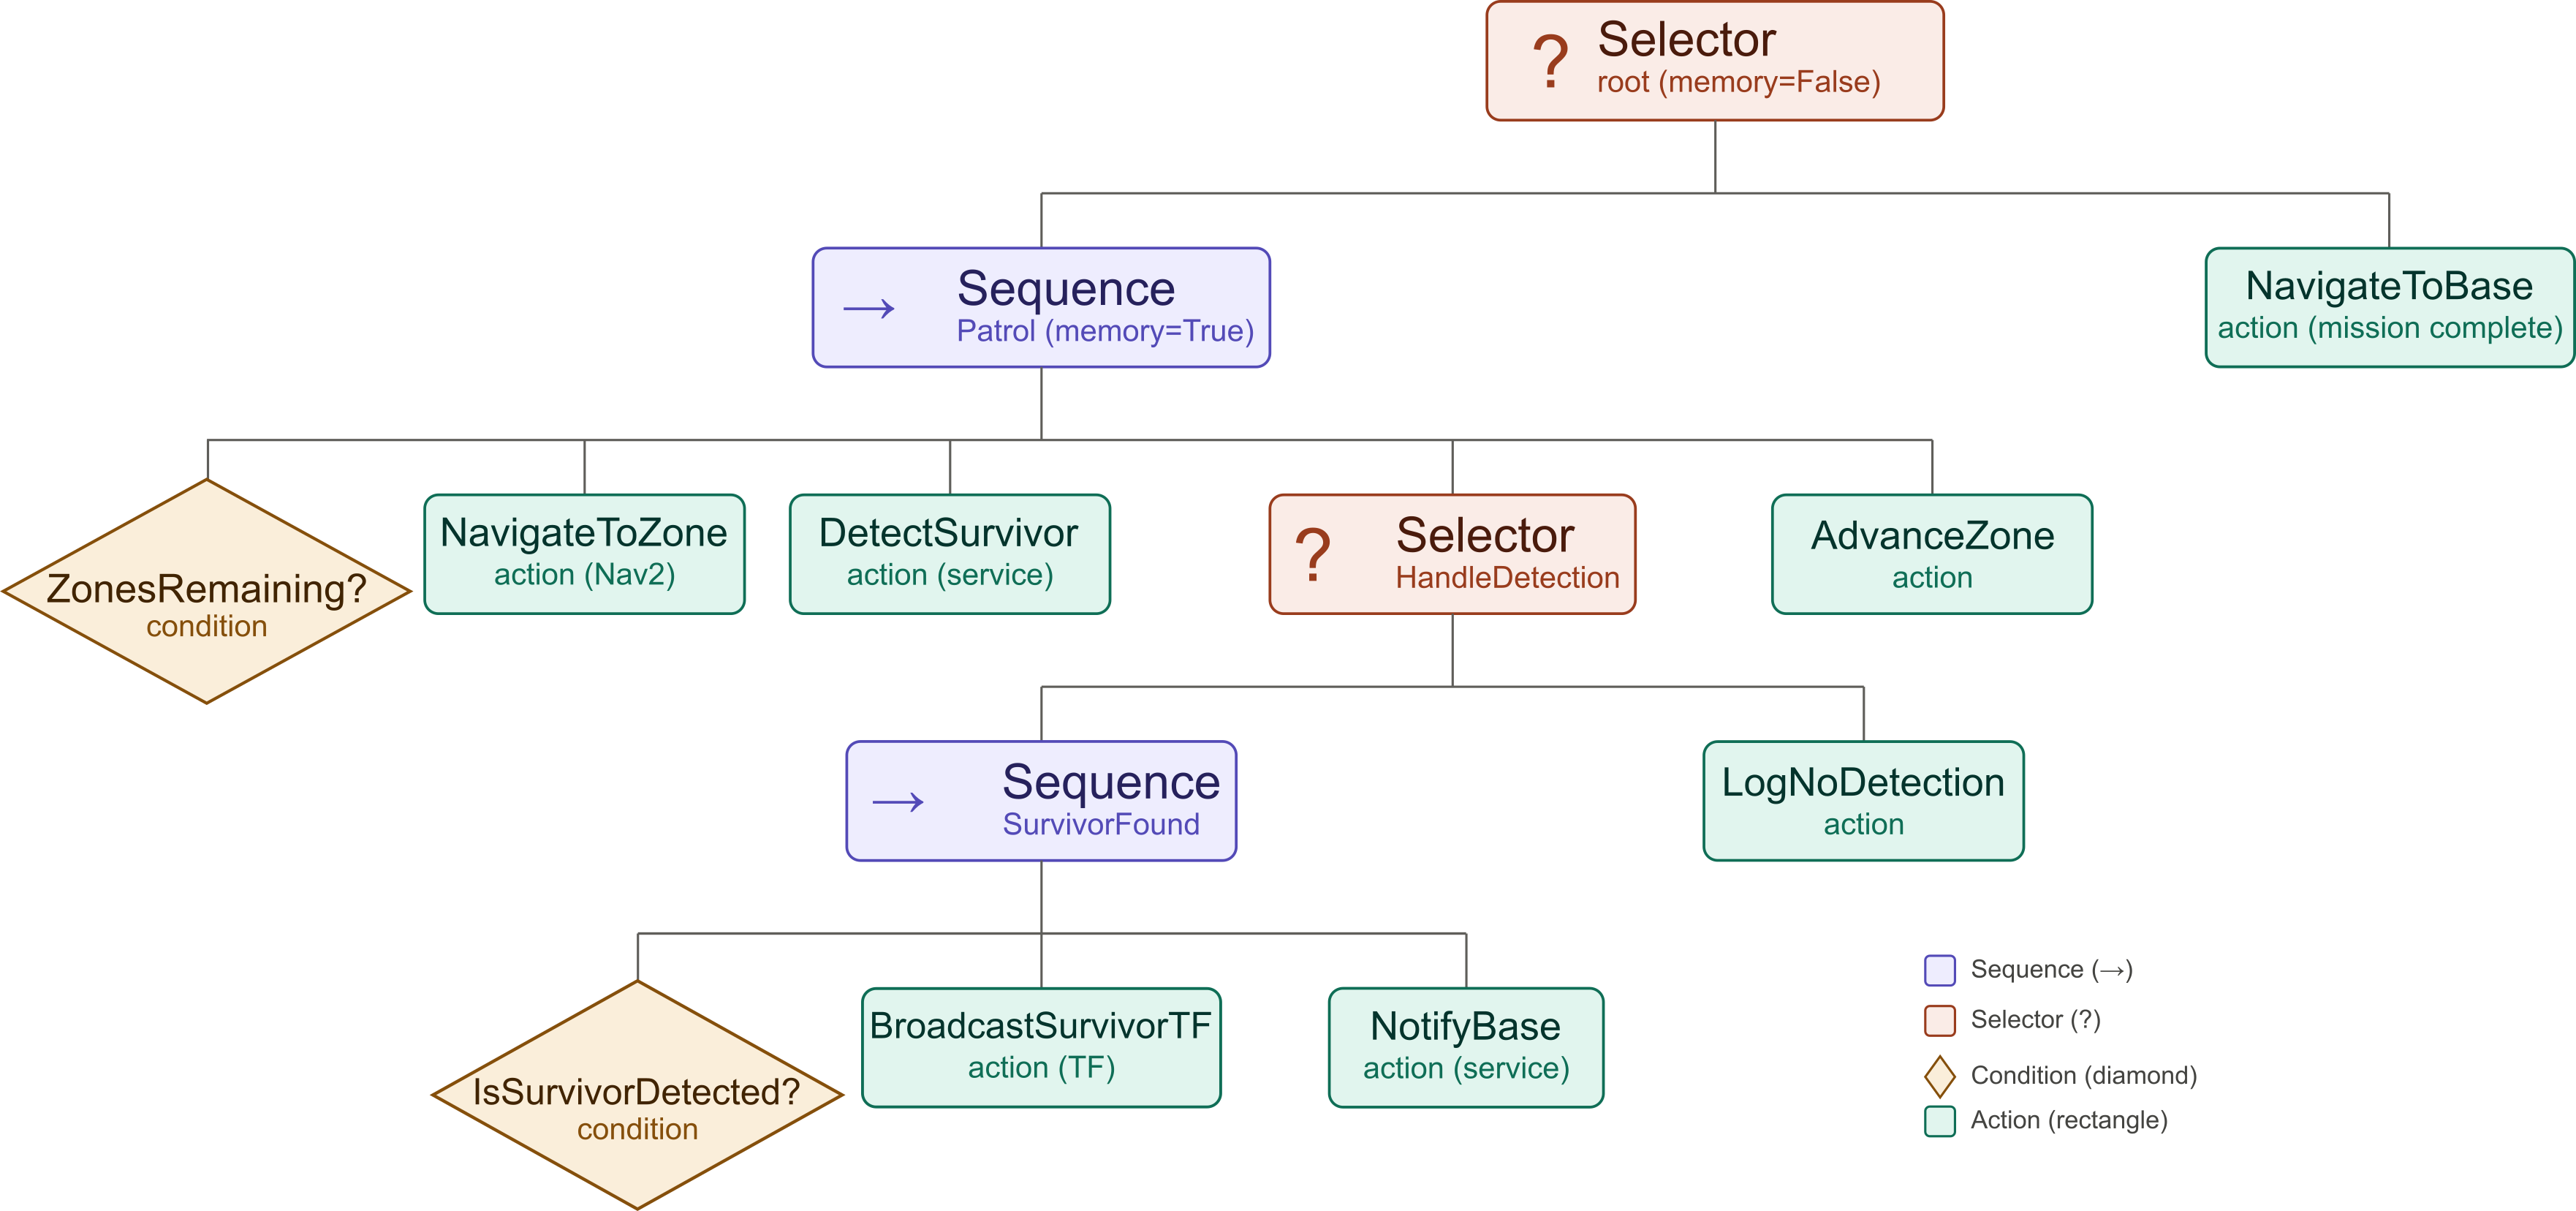
Fig. 126 Behavior tree structure: composites, conditions, and actions.#
Fig. 127 Behavior tree structure: composites, conditions, and actions.#
The diagram above shows what the tree looks like. The diagram
below shows what it does at runtime – the message flow between
your BT node, Nav2, the two simulated service servers, and the
static TF broadcaster. The PlantUML source for the sequence
diagram lives at
docs/source/_static/images/final_project/final_project.puml.
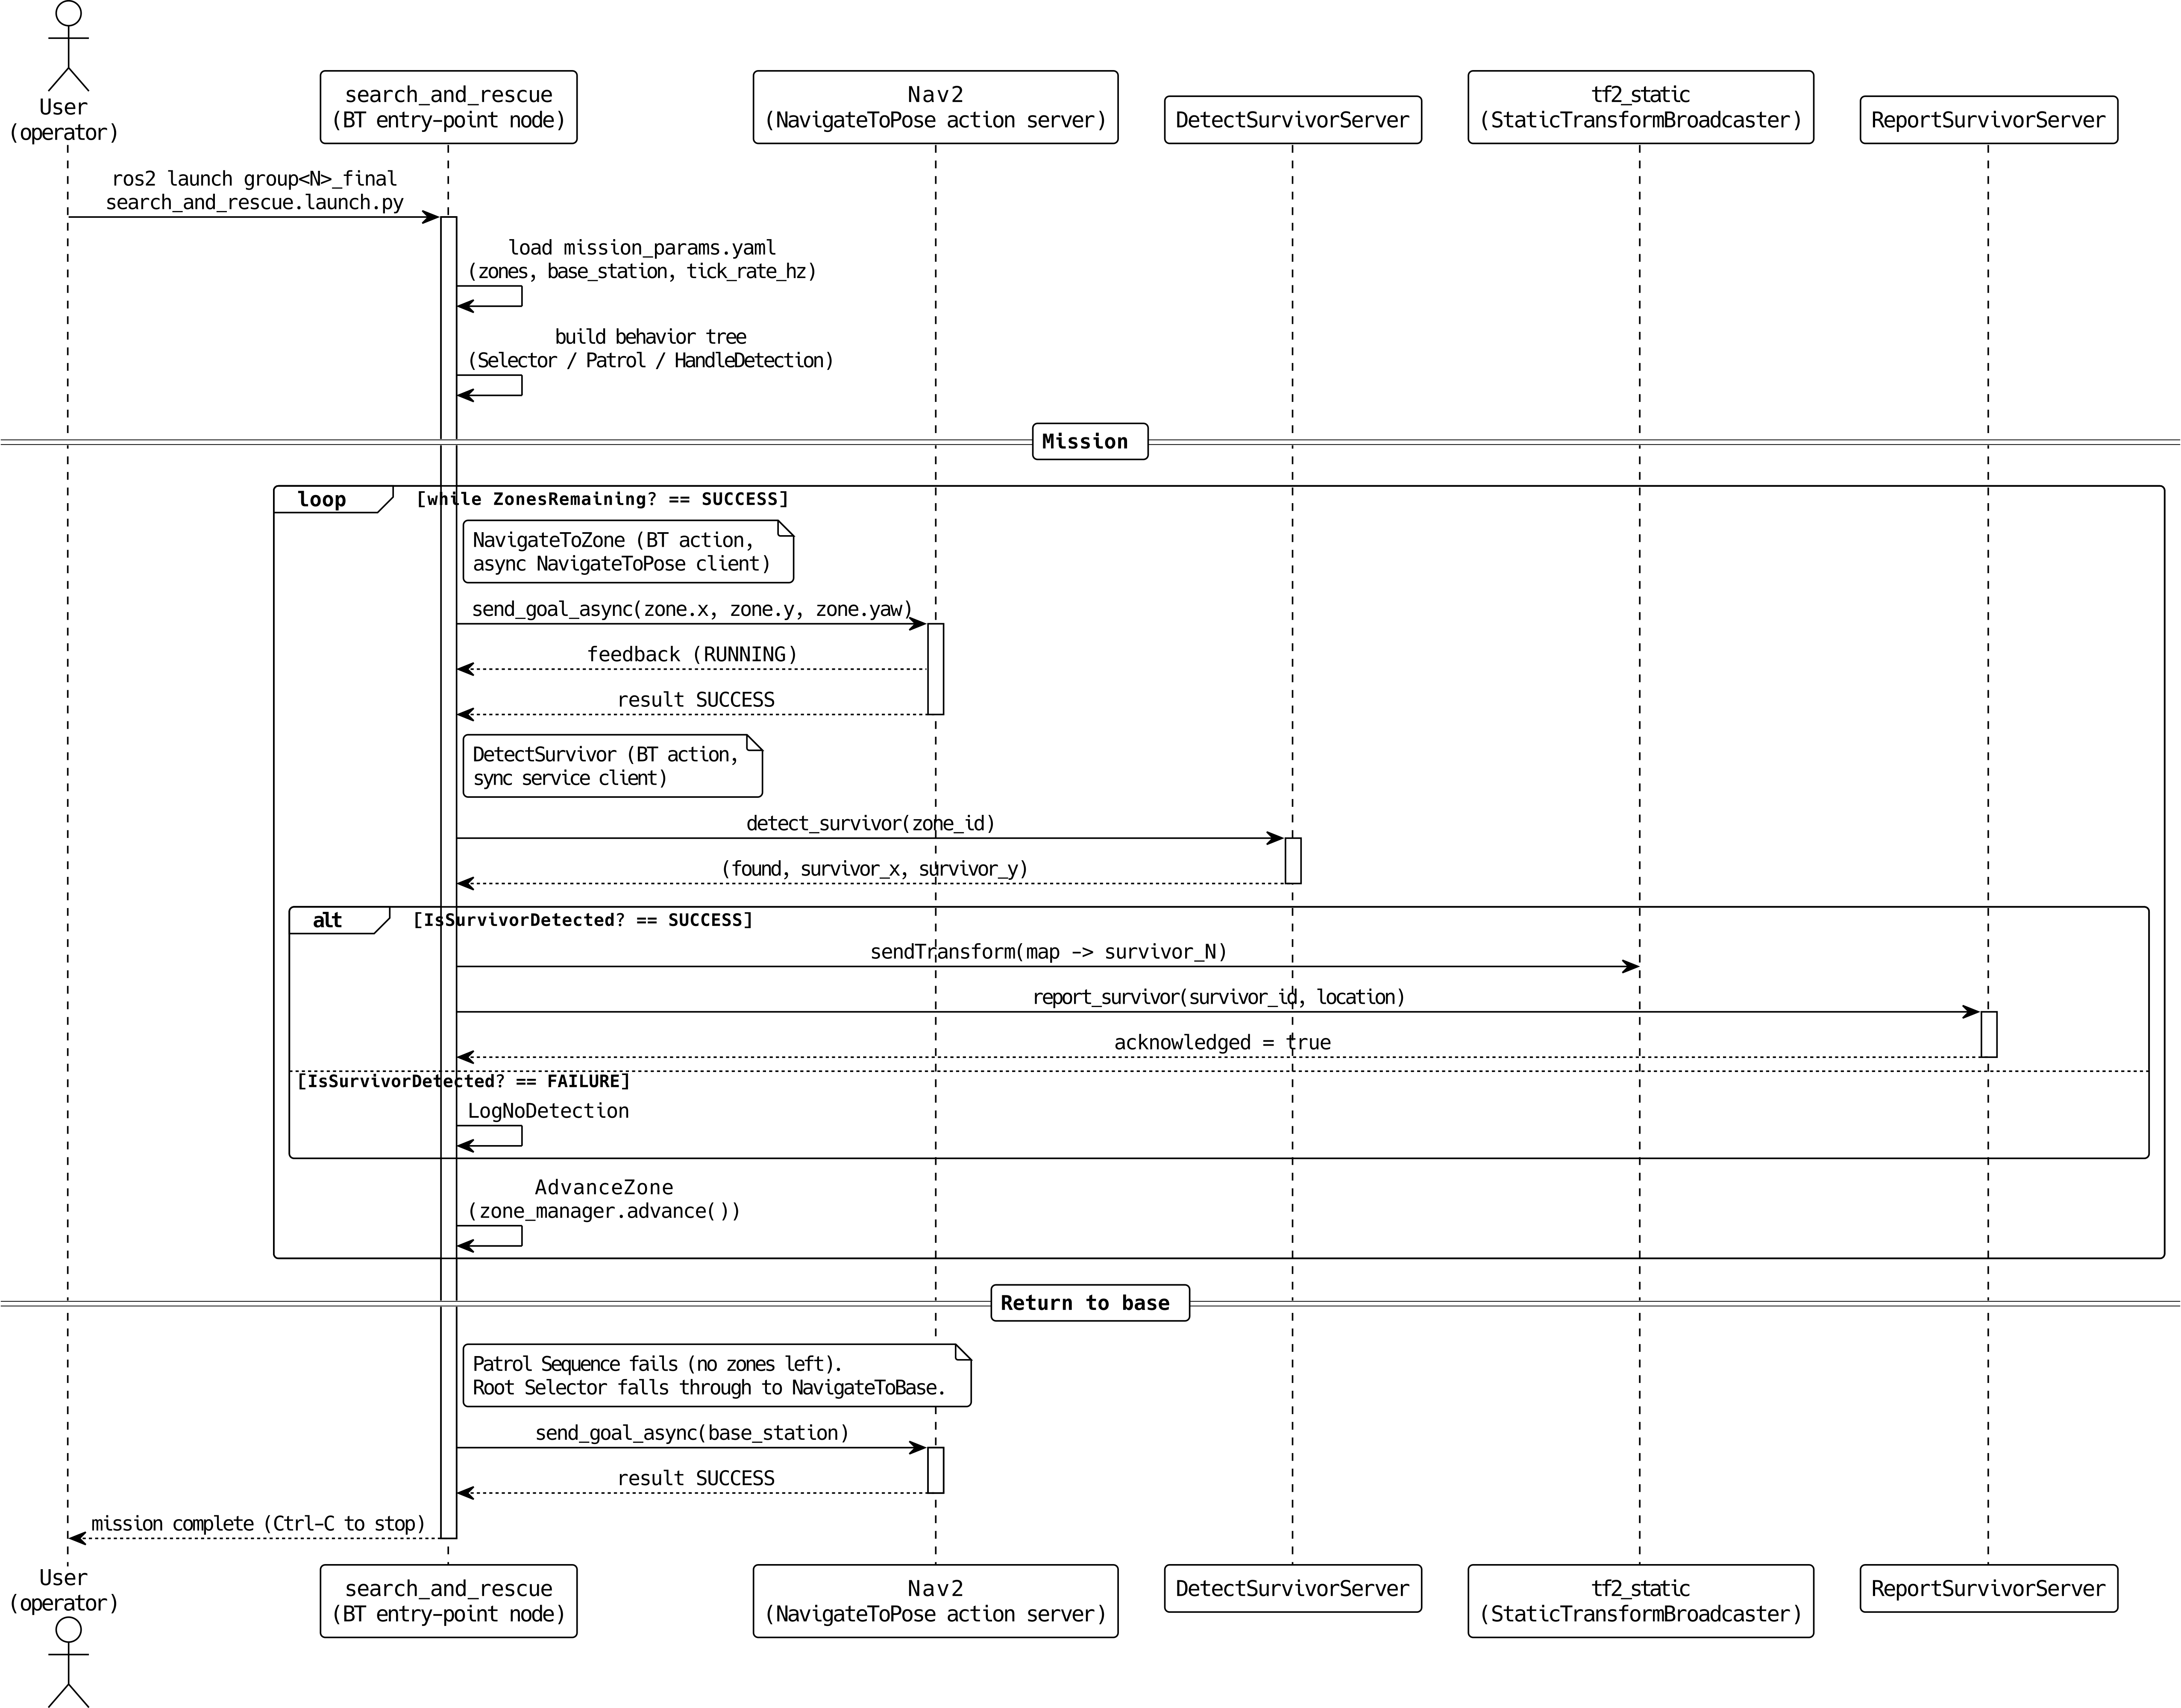
Fig. 128 Runtime message flow during a single mission execution.#
Fig. 129 Runtime message flow during a single mission execution.#
How the tree works, tick by tick:
The root Selector (Mission or ReturnToBase,
memory=False) tries the Patrol Sequence first.The Patrol Sequence (
memory=True) checksZonesRemaining?. If all zones are visited (FAILURE), the Patrol Sequence fails and the root Selector falls back toNavigateToBase(mission complete).If zones remain (SUCCESS),
NavigateToZonesends aNavigateToPosegoal to Nav2 for the current zone. It returns RUNNING while the goal is in flight and SUCCESS on arrival.After reaching a zone,
DetectSurvivorcalls the detection service and stores the result internally.The HandleDetection Selector ticks its first child, the SurvivorFound Sequence, which in turn ticks
IsSurvivorDetected?:If found (SUCCESS): the SurvivorFound Sequence continues to
BroadcastSurvivorTF(publishes a static TF frame) and thenNotifyBase(calls the report service). The Sequence succeeds, so the HandleDetection Selector succeeds.If not found (FAILURE): the SurvivorFound Sequence fails on its first child, so HandleDetection ticks its second child,
LogNoDetection, which logs a message and returns SUCCESS.
AdvanceZonemoves to the next zone, and the Patrol Sequence repeats on the next tick.Once every zone has been visited,
ZonesRemaining?returns FAILURE, so the Patrol Sequence fails and the Selector ticksNavigateToBase. After the robot reaches the base station, the mission is complete – stop the BT node withCtrl-C.
Important
Wrap NavigateToBase in
py_trees.decorators.OneShot(policy=ON_COMPLETION) before
adding it to the root Selector. The root Selector is
memory=False (reactive), so once Patrol fails it ticks
NavigateToBase every tick forever – without OneShot,
initialise() re-sends a fresh Nav2 goal at the base each
tick, the controller instantly reports “Reached the goal!”
because the robot is already there, and the cycle repeats
indefinitely (visible in the launch terminal as a flood of
Begin navigating from current location ... Goal succeeded
pairs every few seconds).
OneShot.ON_COMPLETION caches the first terminal status of
its child, so once NavigateToBase succeeds the decorator
keeps returning SUCCESS on every subsequent tick without
re-entering the child. The robot drives home exactly once and
the BT idles at SUCCESS until Ctrl-C. See
Implementation Guide for the full snippet.
Condition Nodes#
All condition nodes must inherit from
py_trees.behaviour.Behaviour and return only SUCCESS or
FAILURE (never RUNNING).
Node |
Constructor args |
Behavior |
|---|---|---|
|
|
Returns SUCCESS if |
|
|
Holds a reference to the |
Action Nodes#
All action nodes must inherit from
py_trees.behaviour.Behaviour. Each creates its ROS 2 resources
(publishers, subscribers, service clients, action clients) in
setup(**kwargs) using kwargs['node'].
Node |
Constructor args |
Behavior |
|---|---|---|
|
|
Sends a |
|
|
Same as |
|
|
Calls the |
|
(listed above as condition) |
|
|
|
Creates a
Returns SUCCESS after |
|
|
Calls the
Returns SUCCESS if the response’s |
|
|
Calls |
|
|
Logs an info message that no survivor was found at the current zone. Returns SUCCESS. |
Launch File#
Write a Python launch file at
launch/search_and_rescue.launch.py. It is the single entry
point for the mission: it must bring up Nav2 and start your two
simulated service servers and start the behavior tree node. This should be run in a second terminal, after the
Gazebo world is already up. See
Simulation and Provided Code for the
overall structure and a code skeleton.
Required actions in the launch file:
Action |
Package / Source |
Notes |
|---|---|---|
|
|
Pass |
|
|
The behavior tree entry point. |
|
|
Simulated detection service server. |
|
|
Simulated report service server. |
|
|
Optional but recommended. Load
|
Launch file requirements:
All
Nodeactions must useoutput="screen"andemulate_tty=True.output="screen"sends the node’s stdout/stderr (including everyget_logger().info()/warn()/error()call) to the launch terminal. The launch default is"log", which writes silently to~/.ros/log/and shows nothing live – a common cause of “my logger is broken” reports.emulate_tty=Trueallocates a pseudo-TTY for the child process so Python uses line buffering (every\nflushes immediately) instead of the default block buffering on a pipe (~4–8 KB). Without it, log lines arrive in clumps long after the events that produced them, and ANSI color codes for[INFO]/[WARN]/[ERROR]are stripped.
Resolve all package-relative paths (
maps/final_project_map.yaml,config/nav2_params.yaml,config/mission_params.yaml) usingget_package_share_directory('group<N>_final'). This implies themaps/andconfig/directories must be installed – add them todata_filesinsetup.py, otherwiseget_package_share_directory()will not find them at runtime.Load
config/mission_params.yamlfor the behavior tree node via theparametersfield.Declare at least one launch argument that the BT node consumes (for example,
tick_rate_hzwith a sensible default), and forward it to the BT node viaparameters. The intent is to exerciseDeclareLaunchArgumentandLaunchConfiguration– not to expose every internal value.The Gazebo simulation is not started by your launch file – the user runs
ros2 launch rosbot_gazebo
final_project_world.launch.py
in a separate terminal first.
Parameter File#
Create config/mission_params.yaml with the following structure:
/**:
  ros__parameters:
    # Patrol order. Edit this string array to change the visit
    # order without touching any pose values below.
    zone_order: ["zone_a", "zone_b", "zone_c", "zone_d"]

    # Per-zone poses (metres + radians) in the map frame.
    zones:
      zone_a: {x: -3.0, y:  3.0, yaw:  0.0}
      zone_b: {x:  3.5, y:  3.0, yaw:  1.57}
      zone_c: {x:  4.0, y: -3.0, yaw:  3.14}
      zone_d: {x: -3.5, y: -3.0, yaw: -1.57}

    base_station:
      x: 0.0
      y: 0.0
      yaw: 0.0

    tick_rate_hz: 2.0
Important
Why two keys (``zone_order`` + ``zones``) instead of a list of dicts? ROS 2 YAML parameter files require every list element to be the same primitive type. A list of dicts – the most intuitive way to express ordered named records – fails to load:
Couldn't parse params file ... Sequence should be of same type.
Value type 'double' do not belong ...
Splitting the data into a string array (zone_order, which
carries the patrol sequence) plus a nested dict (zones.<id>,
which groups each zone’s pose fields) sidesteps this restriction
and keeps each zone’s fields visually grouped.
Reading the parameters back. Because the patrol order is encoded
in zone_order rather than YAML insertion order, the entry point
joins the two halves back into the natural list-of-dicts:
# Read the patrol order
zone_order = (
    node.get_parameter("zone_order")
        .get_parameter_value()
        .string_array_value
)

# Look up each zone's pose under zones.<id>.{x, y, yaw}
zones = []
for zone_id in zone_order:
    zones.append({
        "id": zone_id,
        "x":   node.get_parameter(f"zones.{zone_id}.x").value,
        "y":   node.get_parameter(f"zones.{zone_id}.y").value,
        "yaw": node.get_parameter(f"zones.{zone_id}.yaw").value,
    })
If you create the temporary parameter node with
automatically_declare_parameters_from_overrides=True and
allow_undeclared_parameters=True, every key under the YAML’s
ros__parameters block is auto-declared and can be read directly.
The /**: wildcard. The top-level key /** is a ROS 2
parameter-file glob: a single * matches one node-name token, and
the doubled /** matches any node name in any namespace.
Because of this, every node started with this YAML loaded will
receive the parameters under ros__parameters – you do not have
to hard-code the BT node’s name (or its namespace) here.
Why this matters in practice:
The BT entry point creates an
rclpynode whose name you may change later (e.g., when prefixing with the group number). With/**, the YAML keeps working without edits.If you launch the same node under a namespace (
namespace="group3"in the launch file), a fully-qualified key likesearch_and_rescue:would silently fail to match (the actual node would be/group3/search_and_rescue);/**matches both forms.You can be more selective when you need to. For example, scoping one parameter to a specific node:
/**:
  ros__parameters:
    tick_rate_hz: 2.0

search_and_rescue:
  ros__parameters:
    zone_order: [...]
    zones: {...}
Here
tick_rate_hzis shared by every node, whilezone_orderandzonesonly load into a node literally namedsearch_and_rescue.
For this assignment, the simple /** block above is enough –
all parameters belong to the BT node, and there is only one
consumer.
README.md#
Your README.md must contain:
A contributions section listing each group member and a short (2 to 4 sentence) summary of what they personally wrote, debugged, tested, or documented.
A brief description of your behavior tree design (which composites use
memory=Truevsmemory=Falseand why).
No other sections are required.
Code Quality#
Warning
The following are mandatory and will result in point deductions if missing.
Docstrings: Every class and every method must have a Google-style docstring.
Type hints: All method parameters and return types must have type annotations.
Inline comments: Include comments that explain non-obvious logic (e.g., Nav2 goal construction, TF frame broadcasting, service call handling).
Naming conventions:
snake_casefor topics, services, methods, and variables.CamelCasefor class names.Logging: Use the ROS 2 logger exclusively. Never use
print(). Use the appropriate severity level.Linting: Ensure Ruff is enabled and no errors appear.