Lecture#
Prerequisites#
One-time workspace and environment setup required before running any code in this lecture.
Build the Demo Packages
Pull the latest code, install dependencies, and build all Lecture 10 demo packages.
cd ~/enpm605_ws && git pull
Install dependencies:
rosdep install --from-paths src --ignore-packages-from-source -y
Scans every
package.xmlundersrc/and installs any missing system dependencies (e.g.,rclpy,std_msgs).--ignore-packages-from-sourceskips dependencies that are already in the workspace (e.g.,custom_interfaces).-yauto-confirms installation prompts.
Build the Lecture 10 packages:
colcon build --symlink-install --packages-up-to lecture10_demo
lecture10_demois a metapackage that declares dependencies onparameters_demo,custom_interfaces,service_demo,message_demo, andaction_demo.--packages-up-tobuilds the named package and all its dependencies in the correct order.
Source the workspace:
source install/setup.bash
Parameters#
A parameter is a configurable value that can be used to customize the behavior of a node at runtime without modifying the code. Parameters allow nodes to store and retrieve data, such as tuning constants, file paths, or robot-specific settings.
Characteristics
Parameters can be set or updated during runtime using the CLI or within the node itself.
Nodes can declare and retrieve parameters, making them useful for settings that do not change frequently.
Parameters can have the following types:
bool,bool[],int,int[],double,double[],string,string[], andbyte[].
Warning
Each parameter belongs to a specific node and cannot be accessed globally by other nodes.
Parameters in Autonomous Vehicles
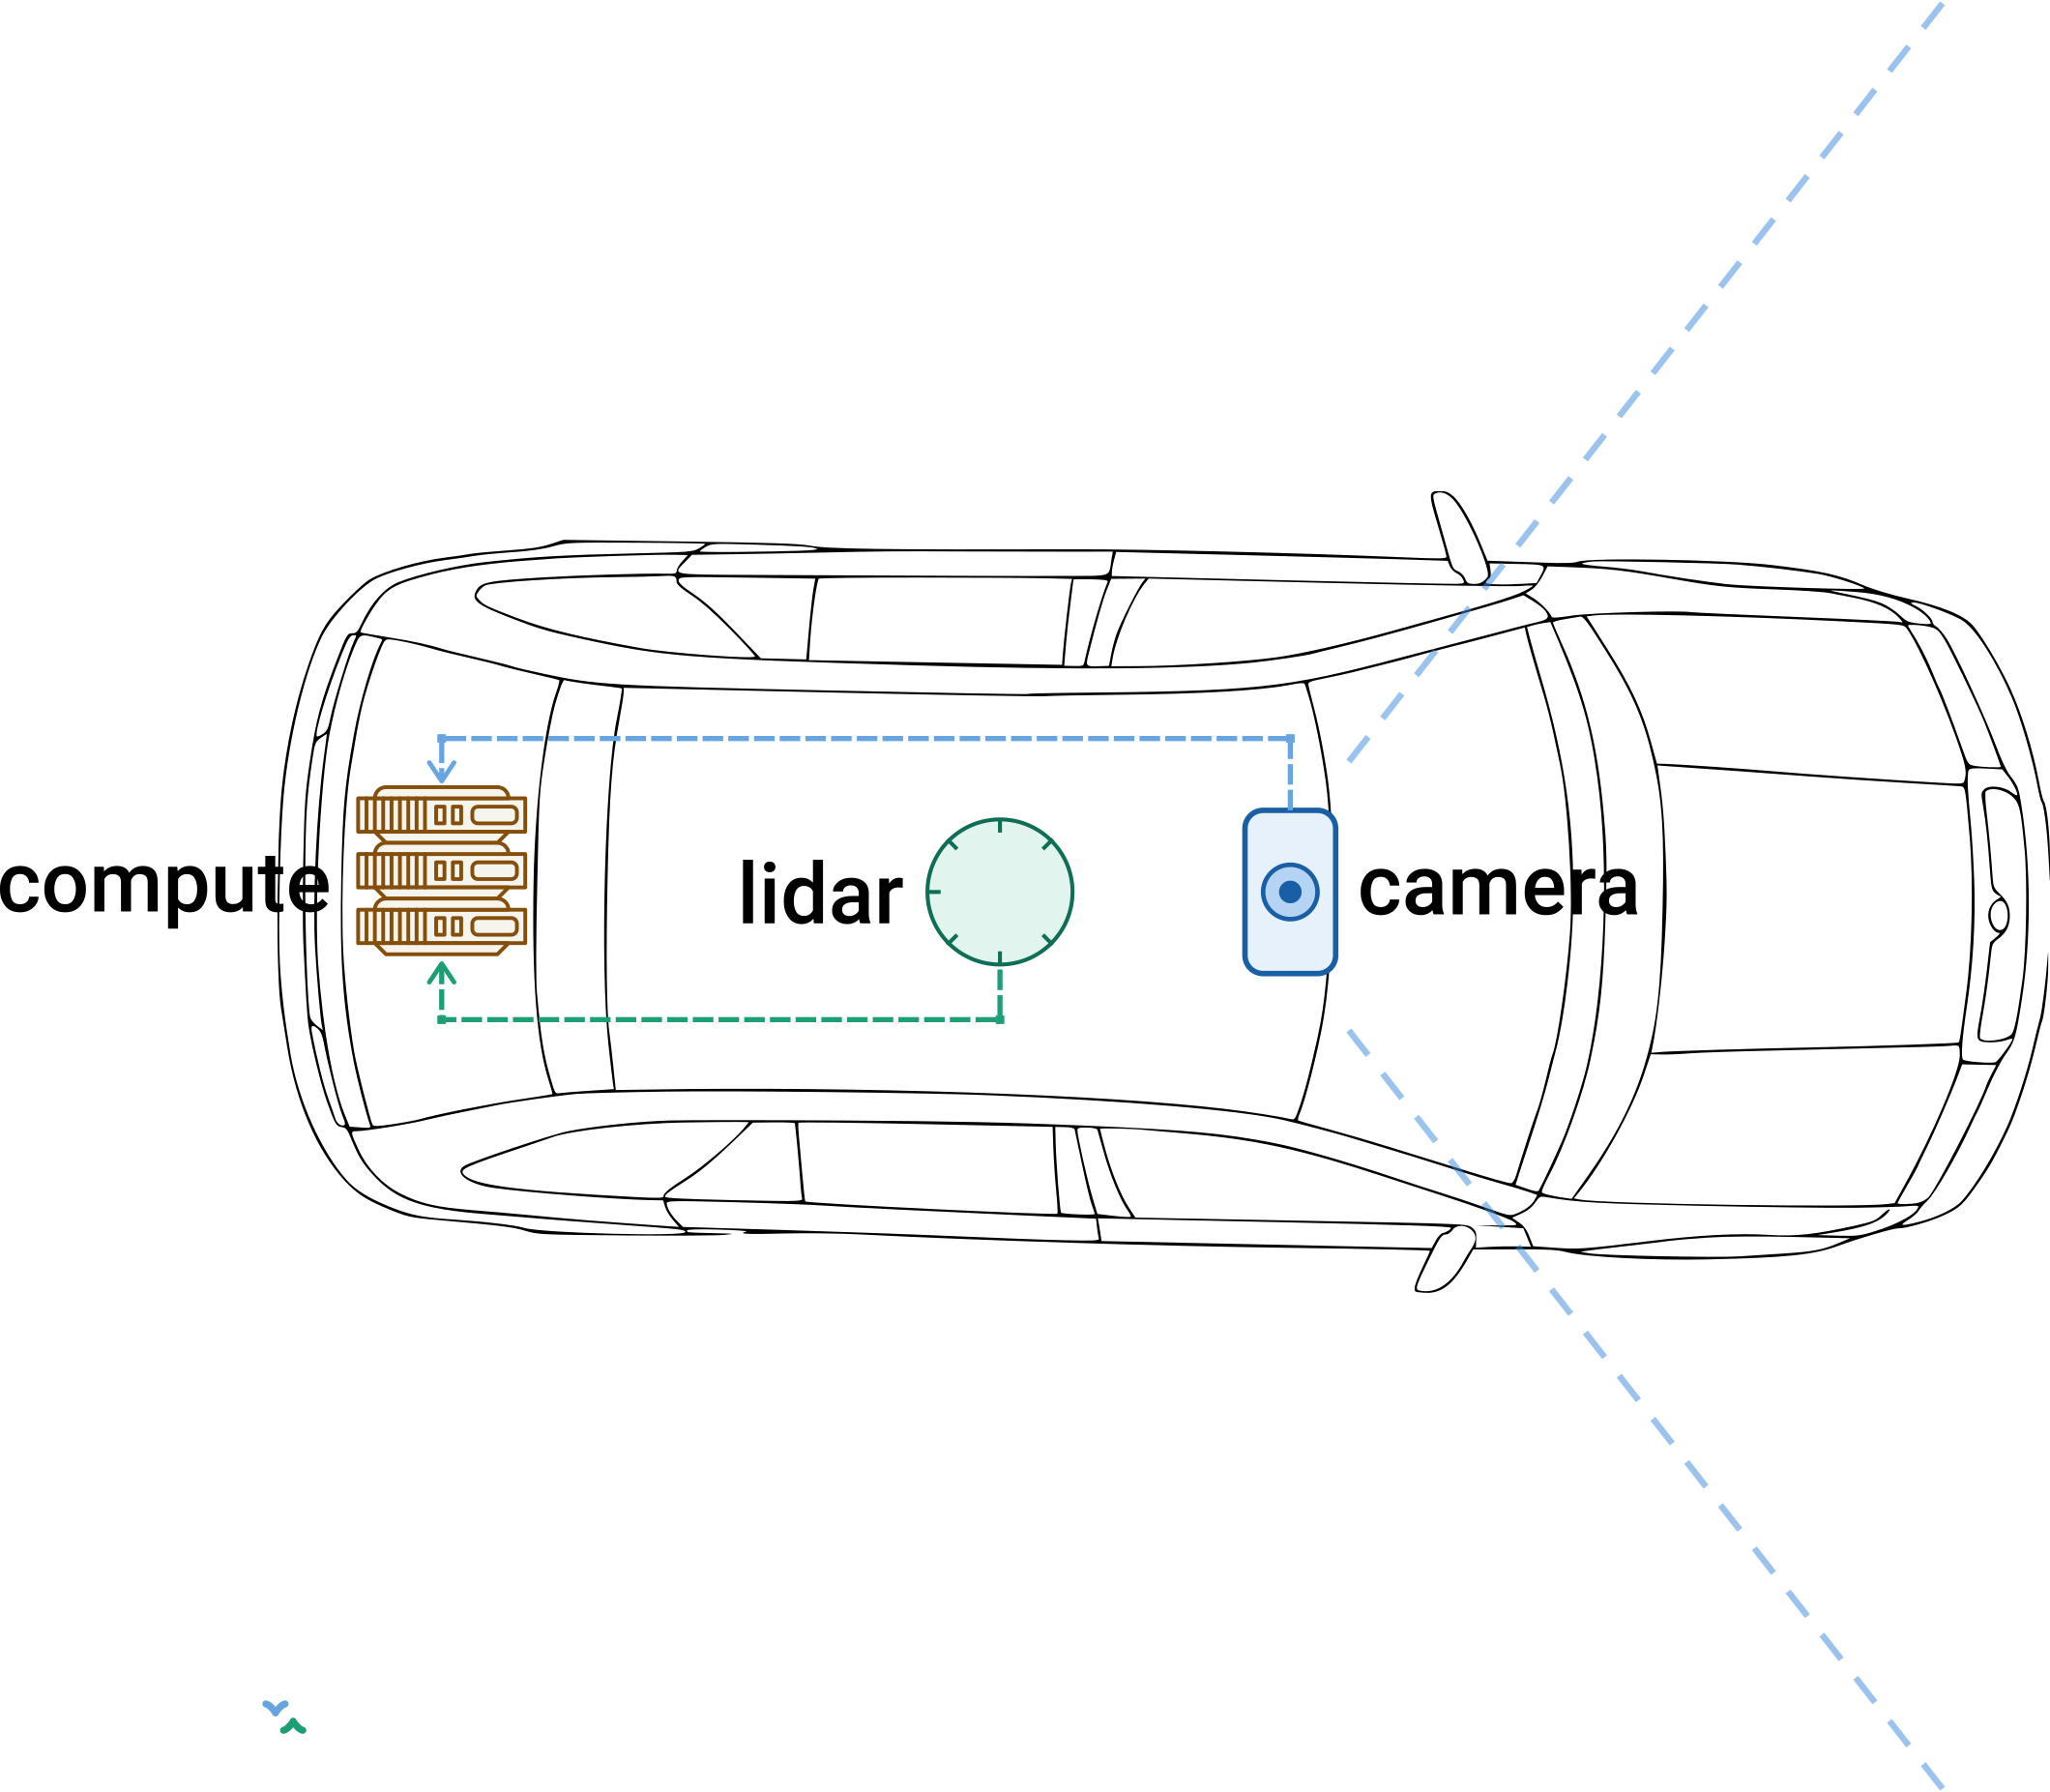
Sensor Node Parameters – Real-World Example
Sensor nodes in robotics typically expose many parameters to control hardware behavior. The table below shows example parameters for a camera node and a LiDAR node, along with their update behavior:
Camera Node Parameters
Parameter |
Type |
Default |
Update |
|---|---|---|---|
|
|
|
Freely writable |
|
|
|
Freely writable |
|
|
|
Timer rebuild |
|
|
|
Freely writable |
|
|
|
Freely writable |
|
|
|
Freely writable |
|
|
|
Node restart |
|
|
|
Node restart |
|
|
|
Node restart |
|
|
|
Node restart |
LiDAR Node Parameters
Parameter |
Type |
Default |
Update |
|---|---|---|---|
|
|
|
Freely writable |
|
|
|
Freely writable |
|
|
|
Freely writable |
|
|
|
Freely writable |
|
|
|
Freely writable |
|
|
|
Freely writable |
|
|
|
Freely writable |
|
|
|
Timer rebuild |
|
|
|
Node restart |
|
|
|
Node restart |
Update categories:
Freely writable – the parameter can be changed at runtime and takes effect immediately.
Timer rebuild – the parameter requires canceling and recreating the timer to change its frequency.
Node restart – the parameter is read only during initialization and requires restarting the node to apply changes.
CLI for Parameters
ros2 param -h
Commands:
  delete      Delete parameter
  describe    Show descriptive information about declared parameters
  dump        Dump the parameters of a node to a yaml file
  get         Get parameter
  list        Output a list of available parameters
  load        Load parameter file for a node
  set         Set parameter
Demonstration
# Start a node
ros2 run demo_nodes_py talker

# List all parameters
ros2 param list /talker

# Get information about a parameter
ros2 param get /talker use_sim_time
Declaring Parameters#
Parameters must be explicitly declared before they can be accessed within a node. If you try to access a parameter without declaring it first, ROS 2 will throw an error.
Approach #1: Basic Declaration
self.declare_parameter("camera_name", "front_cam")
self.declare_parameter("fps", 30)
camera_nameis given the default value"front_cam"fpsis given the default value30
Note
The parameters camera_name and fps are both marked as
freely writable in the sensor parameters table, meaning their
values can be updated at runtime without restarting the node.
Approach #2: Declaration with Constraints and Metadata
from rcl_interfaces.msg import ParameterDescriptor, IntegerRange

self.declare_parameter(
    "camera_name", "front_cam",
    ParameterDescriptor(description="Name of the camera")
)
self.declare_parameter(
    "fps", 30,
    ParameterDescriptor(
        description="Camera frame rate in Hz",
        integer_range=[IntegerRange(from_value=1, to_value=60, step=1)]
    )
)
Note
Constraints and metadata will be used with
ros2 param describe.
Approach #3: Declaring Multiple Parameters at Once
from rcl_interfaces.msg import ParameterDescriptor, IntegerRange

self.declare_parameters(
    namespace="",
    parameters=[
        (
            "camera_name", "front_cam",
            ParameterDescriptor(description="Camera name"),
        ),
        (
            "fps", 30,
            ParameterDescriptor(
                description="Camera frame rate in Hz",
                integer_range=[
                    IntegerRange(from_value=1, to_value=60, step=1)
                ],
            ),
        ),
    ],
)
Verifying Declared Parameters
ros2 run parameters_demo camera_demo
ros2 param list /camera_demo
brightness
camera_frame_id
camera_info_url
camera_name
encoding
exposure_auto
exposure_time_us
fps
image_height
image_width
use_sim_time
ros2 param get /camera_demo camera_name
String value is: front_cam
ros2 param get /camera_demo fps
Integer value is: 30
ros2 param describe /camera_demo fps
Parameter name: fps
  Type: integer
  Description: Camera frame rate in Hz
  Constraints:
    Min value: 1
    Max value: 60
    Step: 1
Retrieving Parameters#
After declaring a parameter, you might want to retrieve its value with
get_value() for several reasons:
Initialization: Parameters are often declared with default values, but you may need to retrieve the actual value to initialize parts of your node or its functionalities based on this configuration.
Dynamic reconfiguration: Parameters can be changed at runtime. Retrieving the parameter allows your node to react to changes and adjust its behavior dynamically.
Operational tuning: Parameters are frequently used for tuning algorithms or adjusting settings for sensors and actuators.
Retrieving Parameter Values
# Get param camera_name and store it for later use
self._camera_name = (
    self.get_parameter("camera_name")
    .get_parameter_value()
    .string_value
)

# Get param fps and store it for later use
self._fps = (
    self.get_parameter("fps")
    .get_parameter_value()
    .integer_value
)
Using Parameters#
Once parameters are stored in class attributes, use them to control node behavior and to provide meaningful context.
Using Parameters in Practice
Example: Provide Meaningful Context in Logs
self.get_logger().info(f"Image published from: {self._camera_name}")
Example: Control Publishing Frequency
self._image_timer = self.create_timer(
    1.0 / self._fps, self._image_pub_callback
)
Demonstration
ros2 run parameters_demo camera_demo
Think About It
ros2 topic hz /camera/image_color reveals a significantly
lower actual rate. Why? How do we solve this?
Requested vs. Actual Performance
ros2 topic bw /camera/image_color demonstrates the high
bandwidth cost of image transmission.
Can we decrease the image size?
Can we log once in a while and not in each cycle?
Can we prevent the same computations from happening in the callback?
Note
This illustrates the important distinction between requested performance and system-constrained reality. Always measure the actual publishing frequency of your nodes to ensure they meet your application requirements.
Setting Parameters#
Parameters can be set before or during node execution, allowing dynamic configuration without modifying or recompiling the source code.
There are several ways to set parameters:
Pass individual values on the command line (
-p).Hardcode values in a launch file.
Load a YAML parameter file.
Dynamic updates with
set_parameters()orros2 param set.Expose values as overridable launch file arguments.
1. Pass Individual Values (CLI)
Use --ros-args to pass arguments to a node on the command line.
Use -p <parameter>:=<value> to set a value for a parameter.
ros2 run parameters_demo camera_demo
[INFO][...][camera_demo]: Published random camera image from: front_cam
ros2 run parameters_demo camera_demo --ros-args -p camera_name:='rear_cam'
[INFO][...][camera_demo]: Published random camera image from: rear_cam
Think About It
Assign different values to the fps parameter: 1, 10, 50,
and 70.
2. Hardcode Values in Launch Files
Set parameter values in a launch file:
camera_node = Node(
    package='parameters_demo',
    executable='camera_demo',
    parameters=[
        {'camera_name': 'rear_cam'},
        {'fps': 15}
    ],
    output='screen',
    emulate_tty=True
)
ros2 launch parameters_demo demo1.launch.py
3. Load a YAML Parameter File
A parameter file in ROS 2 is a YAML configuration file that stores parameters for one or more nodes.
camera_demo:  # Name of the node
  ros__parameters:
    camera_name: 'rear_cam'
    fps: 15
    ...

lidar_demo:  # Name of the node
  ros__parameters:
    lidar_name: 'top_lidar'
    scan_frequency: 20
    ...
YAML files are usually placed in the
config/directory (best practice).Ensure you edit
setup.pyto install theconfig/folder.
Parameter file with CLI:
Use --ros-args and --params-file <path> to pass the
parameter file to the node (relative or absolute path):
ros2 run parameters_demo camera_demo --ros-args --params-file <file path>
Parameter file with launch files:
Store the path of the parameter file:
parameters_demo_file = PathJoinSubstitution(
    [FindPackageShare("parameters_demo"), "config", "parameters_demo.yaml"]
)
Pass the parameter file to the node:
camera_node = Node(
    package="parameters_demo",
    executable="camera_demo",
    parameters=[parameters_demo_file],
    output="screen",
    emulate_tty=True,
)
ros2 launch parameters_demo demo2.launch.py
4. Modifying Parameters at Runtime
Parameters can be modified at runtime to enable dynamic adjustments.
Programmatically:
from rclpy.parameter import Parameter

self.set_parameters([Parameter("fps", Parameter.Type.INTEGER, 15)])
Tip
This is useful when the node needs to adjust its own behavior based on runtime conditions – e.g., reducing the frame rate when CPU usage is high.
CLI: ros2 param set
Note
Sends a parameter update request to a running node without restarting it or modifying the source code.
Why Did the Value Not Change?
Warning
After a parameter is read during initialization, the node does not observe subsequent updates unless it is explicitly notified.
Note
Add an on-set-parameters callback so the node is notified
immediately when the parameter is modified. The method
add_on_set_parameters_callback() registers a callback function
that will be automatically invoked whenever someone attempts to
change the node’s parameters through the ROS 2 parameter API.
Parameter Change Callback
Register a callback function for parameter changes:
self.add_on_set_parameters_callback(self._parameter_update_cb)
Define the callback:
def _parameter_update_cb(self, params):
    success = False
    for param in params:
        if param.name == "camera_name":
            if param.type_ == Parameter.Type.STRING:  # validation
                success = True
                self._camera_name = param.value  # modify the attribute
        elif param.name == "fps":
            if param.type_ == Parameter.Type.INTEGER:
                self._fps = param.value
                success = True
    return SetParametersResult(successful=success)
Demonstration
ros2 launch parameters_demo demo2.launch.py
ros2 param set camera_demo camera_name 'front_cam'
Updating Timer Frequency
A timer is initialized when the node is created and executes its associated callback once the node begins running. To modify the timer’s frequency, it must be canceled and then recreated using the updated frequency.
# 1. Cancel the timer
self._image_timer.cancel()

# 2. Recreate the timer
self._image_timer = self.create_timer(
    1 / self._fps, self._image_pub_callback
)
ros2 run parameters_demo camera_demo
ros2 topic hz /camera/image_color
ros2 param set camera_demo fps 10
5. Use Parameters as Launch File Arguments
Parameters are typically hardcoded in a YAML file, but they can also be exposed as launch file arguments. This allows the caller to override specific parameter values at launch time without modifying the YAML file or the node source code.
Declare the parameter that will be overridable:
# lidar_demo.py
self.declare_parameter("lidar_model", "default_lidar")
Declare a launch argument and forward it to the node via
parameters:
lidar_model = LaunchConfiguration("lidar_model")
lidar_model_arg = DeclareLaunchArgument(
    "lidar_model", default_value="velodyne"
)
lidar_node = Node(
    package="parameters_demo",
    executable="lidar_demo",
    parameters=[parameters_demo_file, {"lidar_model": lidar_model}],
    output="screen",
    emulate_tty=True,
)
ld.add_action(lidar_model_arg)
ld.add_action(lidar_node)
ros2 launch parameters_demo demo3.launch.py lidar_model:=ouster
Custom Interfaces#
Custom interface definitions allow you to create domain-specific
message, service, and action types beyond what std_msgs,
geometry_msgs, and sensor_msgs provide.
Verify the Interfaces
# List all interfaces in the package
ros2 interface list | grep custom_interfaces

# Show message definition
ros2 interface show custom_interfaces/msg/TaskStatus

# Show service definition
ros2 interface show custom_interfaces/srv/ComputeTrajectory

# Show action definition
ros2 interface show custom_interfaces/action/Navigate
Why Custom Interfaces?
A warehouse robot needs a
TaskStatusmessage with fields unique to its workflow.A navigation pipeline needs a
ComputeTrajectoryservice to compute a trajectory between two points.A navigation system needs a
Navigateaction with waypoints, progress feedback, and completion results.
Warning
Interface packages are always CMake packages (ament_cmake),
even if all your nodes are in Python. The code generators
(rosidl) require CMake infrastructure.
Interface Package Structure
A dedicated interface package keeps generated types separate from node implementations.
custom_interfaces/
+-- CMakeLists.txt
+-- package.xml
+-- msg/
|   +-- TaskStatus.msg
+-- srv/
|   +-- ComputeTrajectory.srv
+-- action/
    +-- Navigate.action
package.xml dependencies (required for all interface packages):
<buildtool_depend>ament_cmake</buildtool_depend>
<buildtool_depend>rosidl_default_generators</buildtool_depend>
<exec_depend>rosidl_default_runtime</exec_depend>
<member_of_group>rosidl_interface_packages</member_of_group>
Defining a Custom Message (.msg)#
A .msg file defines the fields of a topic message. Each line
contains a type and a field name.
TaskStatus.msg
# Status constants
uint8 PENDING=0
uint8 IN_PROGRESS=1
uint8 COMPLETED=2
uint8 FAILED=3

# Fields
std_msgs/Header header
string task_id
string task_description
uint8 status
float64 completion_percentage
string message
Why Use Constants?
Without constants, code uses magic numbers like
msg.status = 2(unclear and error-prone).Constants provide self-documenting names:
msg.status = TaskStatus.COMPLETEDThey are compiled into class-level attributes in the target language, ensuring a single source of truth shared across all nodes.
Any node importing
TaskStatusgets the same constant values (no need to redefine them).
CMakeLists.txt for Custom Message
find_package(rosidl_default_generators REQUIRED)
find_package(std_msgs REQUIRED)

rosidl_generate_interfaces(${PROJECT_NAME}
  "msg/TaskStatus.msg"
  DEPENDENCIES std_msgs
)
rosidl_generate_interfacesgenerates Python and C++ code from the.msgdefinition.The generated code is placed in the
install/folder of the workspace (e.g.,install/custom_interfaces/lib/python3/ dist-packages/custom_interfaces/msg/).After building, source the workspace so Python can find the generated module.
Using TaskStatus in a Node
msg = TaskStatus()
msg.header.stamp = self.get_clock().now().to_msg()
msg.task_id = "task_001"
msg.task_description = "Pick and place operation"
msg.status = TaskStatus.COMPLETED  # Use constant, not magic number
msg.completion_percentage = 100.0
msg.message = "Task completed successfully"
Demonstration
ros2 run message_demo task_status_demo
ros2 topic echo /task_status
Defining a Custom Service (.srv)#
A .srv file defines a request and response separated by
---.
ComputeTrajectory.srv
# Request
geometry_msgs/Pose start_pose
geometry_msgs/Pose goal_pose
float64 max_velocity
---
# Response
bool success
string message
geometry_msgs/Pose[] waypoints
CMakeLists.txt:
rosidl_generate_interfaces(${PROJECT_NAME}
  "msg/TaskStatus.msg"
  "srv/ComputeTrajectory.srv"
  DEPENDENCIES std_msgs geometry_msgs
)
Using ComputeTrajectory in a Node
from custom_interfaces.srv import ComputeTrajectory

# In a service server callback
def compute_callback(self, request, response):
    response.success = True
    response.message = "Trajectory computed"
    response.waypoints = [...]
    return response
Defining a Custom Action (.action)#
An .action file has three sections separated by ---: goal,
result, and feedback.
Navigate.action
# Goal
geometry_msgs/Pose target_pose
float64 max_speed
---
# Result
bool success
float64 total_distance
float64 elapsed_time
---
# Feedback
geometry_msgs/Pose current_pose
float64 distance_remaining
float64 percent_complete
CMakeLists.txt for All Interfaces
find_package(action_msgs REQUIRED)

rosidl_generate_interfaces(${PROJECT_NAME}
  "msg/TaskStatus.msg"
  "srv/ComputeTrajectory.srv"
  "action/Navigate.action"
  DEPENDENCIES std_msgs geometry_msgs action_msgs
)
Using in a Node:
from custom_interfaces.action import Navigate

goal = Navigate.Goal()
goal.target_pose.position.x = 5.0
goal.max_speed = 1.0
Note
After modifying any interface file, you must rebuild the
custom_interfaces package and re-source the workspace before
dependent packages can see the changes.
Services#
Services implement request/response communication between nodes. Unlike topics (continuous data streams), services are used for discrete, one-shot operations that return a result. The client can wait for the response synchronously or asynchronously.
Service Communication Model
The server advertises the service and waits for requests. When a request arrives, it executes a callback and returns a response.
The client sends a request and waits for the response. The wait can be synchronous (blocking) or asynchronous (non-blocking).
A service is defined by its type (the
.srvdefinition) and its name (e.g.,/compute_trajectory).
When to use services vs. topics:
Topic |
Service |
|
|---|---|---|
Pattern |
Publisher/subscriber (1:N) |
Client/server (1:1 per call) |
Timing |
Continuous, periodic |
On-demand, one-shot |
Examples |
Sensor data, |
Spawn model, compute IK |
Blocking? |
No |
|
Writing a Service Server#
A service server registers a callback that runs when a client sends a request. The callback receives the request, performs computation, populates the response, and returns it.
In this demo we simulate trajectory computation – the server logs the request and returns a success message without actually computing a path.
Server Constructor
class TrajectoryServer(Node):
    def __init__(self, node_name: str) -> None:
        super().__init__(node_name)
        self._service = self.create_service(
            ComputeTrajectory,
            "compute_trajectory",
            self._service_callback
        )
        self.get_logger().info("Trajectory server ready.")
create_serviceregisters a service with three arguments:ComputeTrajectory– The service type (a.srvinterface)."compute_trajectory"– The service name clients will call.self._service_callback– The callback that processes requests and returns responses.
Note
The server remains active as long as the node is running.
Service Callback
def _service_callback(self, request, response):
    # Simulate waypoints along a straight line
    for i in range(1, 4):
        wp = Pose()
        wp.position.x = # computations
        response.waypoints.append(wp)

    response.success = True
    response.message = "Trajectory computed successfully"
    return response
This is the callback triggered when a client calls the service.
requestandresponseare auto-populated from the.srvdefinition.Computes 3 evenly spaced waypoints between
request.start_poseandrequest.goal_pose.Appends each waypoint to
response.waypoints.Sets
response.successandresponse.message, then returns the response.
Server Demonstration
# Start the server
ros2 run service_demo trajectory_server

# Inspect
ros2 service list
ros2 service info /compute_trajectory
ros2 service type /compute_trajectory
Call from CLI:
ros2 service call -h
Writing a Service Client#
A service client creates a connection to a named service, sends a request, and handles the response. Two calling patterns are available:
Asynchronous (
call_async()): returns aFutureimmediately and handles the response in a callback. The node continues spinning while waiting. This is the recommended pattern.Synchronous (
call()): blocks the calling thread until the response arrives. Simpler, but requires aMultiThreadedExecutorand a separate callback group to avoid deadlocks.
Tip
You can call a service directly from the CLI without writing a client node.
Client Constructor
class TrajectoryClient(Node):
    def __init__(self, node_name: str) -> None:
        super().__init__(node_name)
        self._client = self.create_client(
            ComputeTrajectory, "compute_trajectory"
        )

        while not self._client.wait_for_service(timeout_sec=1.0):
            self.get_logger().info("Waiting for service...")

        self._timer = self.create_timer(2.0, self._timer_callback)

    def _timer_callback(self) -> None:
        """Send a request every timer tick."""
        self._send_request()
create_clientcreates a service client with the service type and service name.wait_for_serviceblocks until the server is available (1-second timeout per attempt).A timer calls
_send_requestevery 2 seconds. The timer is used for demonstration purposes. In reality you will not send a request periodically.
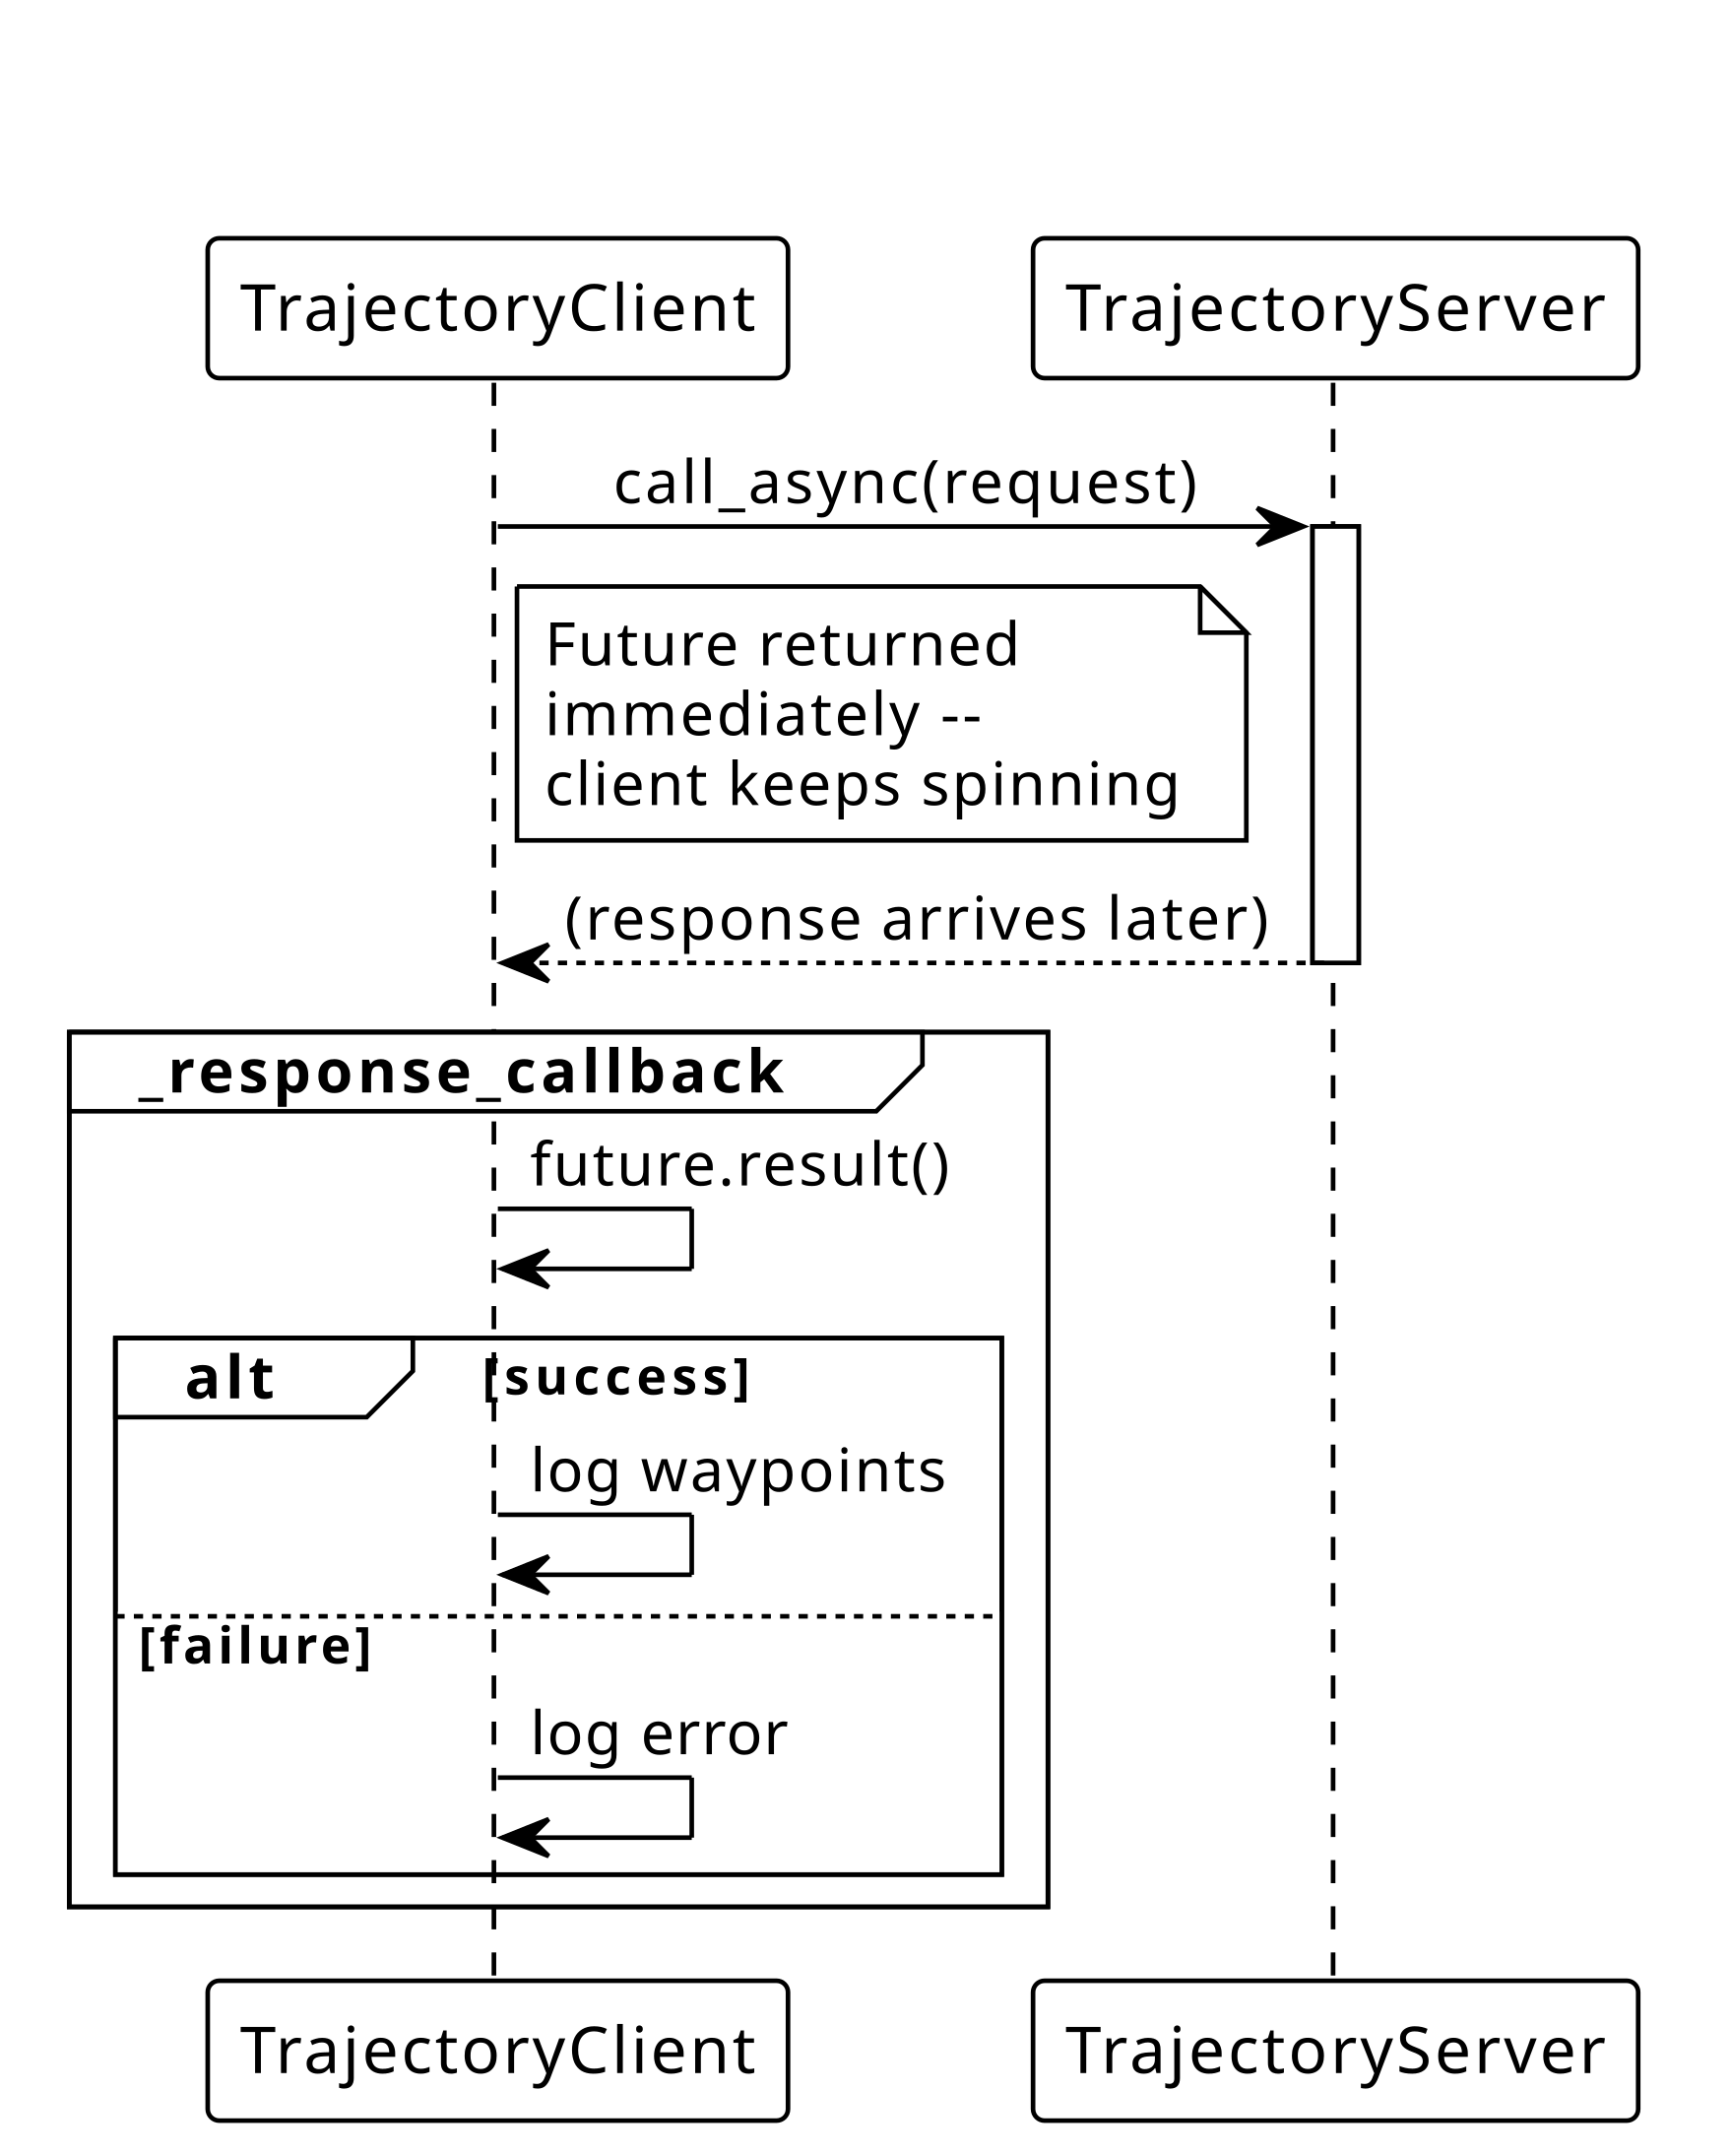
Asynchronous Calls#
The asynchronous client sends a request and continues processing other callbacks while waiting for the response. This is the recommended pattern.
Async Call Diagram
Sending a Request (Async)
def _send_request(self):
    request = ComputeTrajectory.Request()
    request.goal_pose.position.x = random.uniform(0.0, 10.0)
    request.max_velocity = 1.0

    future = self._client.call_async(request)

    future.add_done_callback(self._response_callback)
Creates a
Requestobject and populates its fields.call_asyncsends the request to the server without blocking.add_done_callbackregisters_response_callbackto run when the server’s response arrives.
What is a Future?
A Future is a placeholder for a result that does not exist
yet.
Returned by any
*_async()call (e.g.,send_goal_async,get_result_async).The call returns immediately – no thread is blocked.
Attach a callback with
future.add_done_callback(fn)– the callback fires when the result arrives.Inside the callback,
future.result()retrieves the actual value.
Response Callback (Async)
def _response_callback(self, future):
    response = future.result()
    if response.success:
        self.get_logger().info(f"Success: {response.message}")
        for i, wp in enumerate(response.waypoints):
            self.get_logger().info(
                f"  Waypoint {i}: ({wp.position.x}, "
                f"{wp.position.y}, {wp.position.z})")
    else:
        self.get_logger().error(f"Failed: {response.message}")
future.result()retrieves the server’s response.If
response.successisTrue, logs the message and iterates over the waypoints.Otherwise, logs an error with the failure message.
Async Client Demonstration
# Terminal 1
ros2 run service_demo trajectory_server

# Terminal 2
ros2 run service_demo trajectory_client_async
Synchronous Calls#
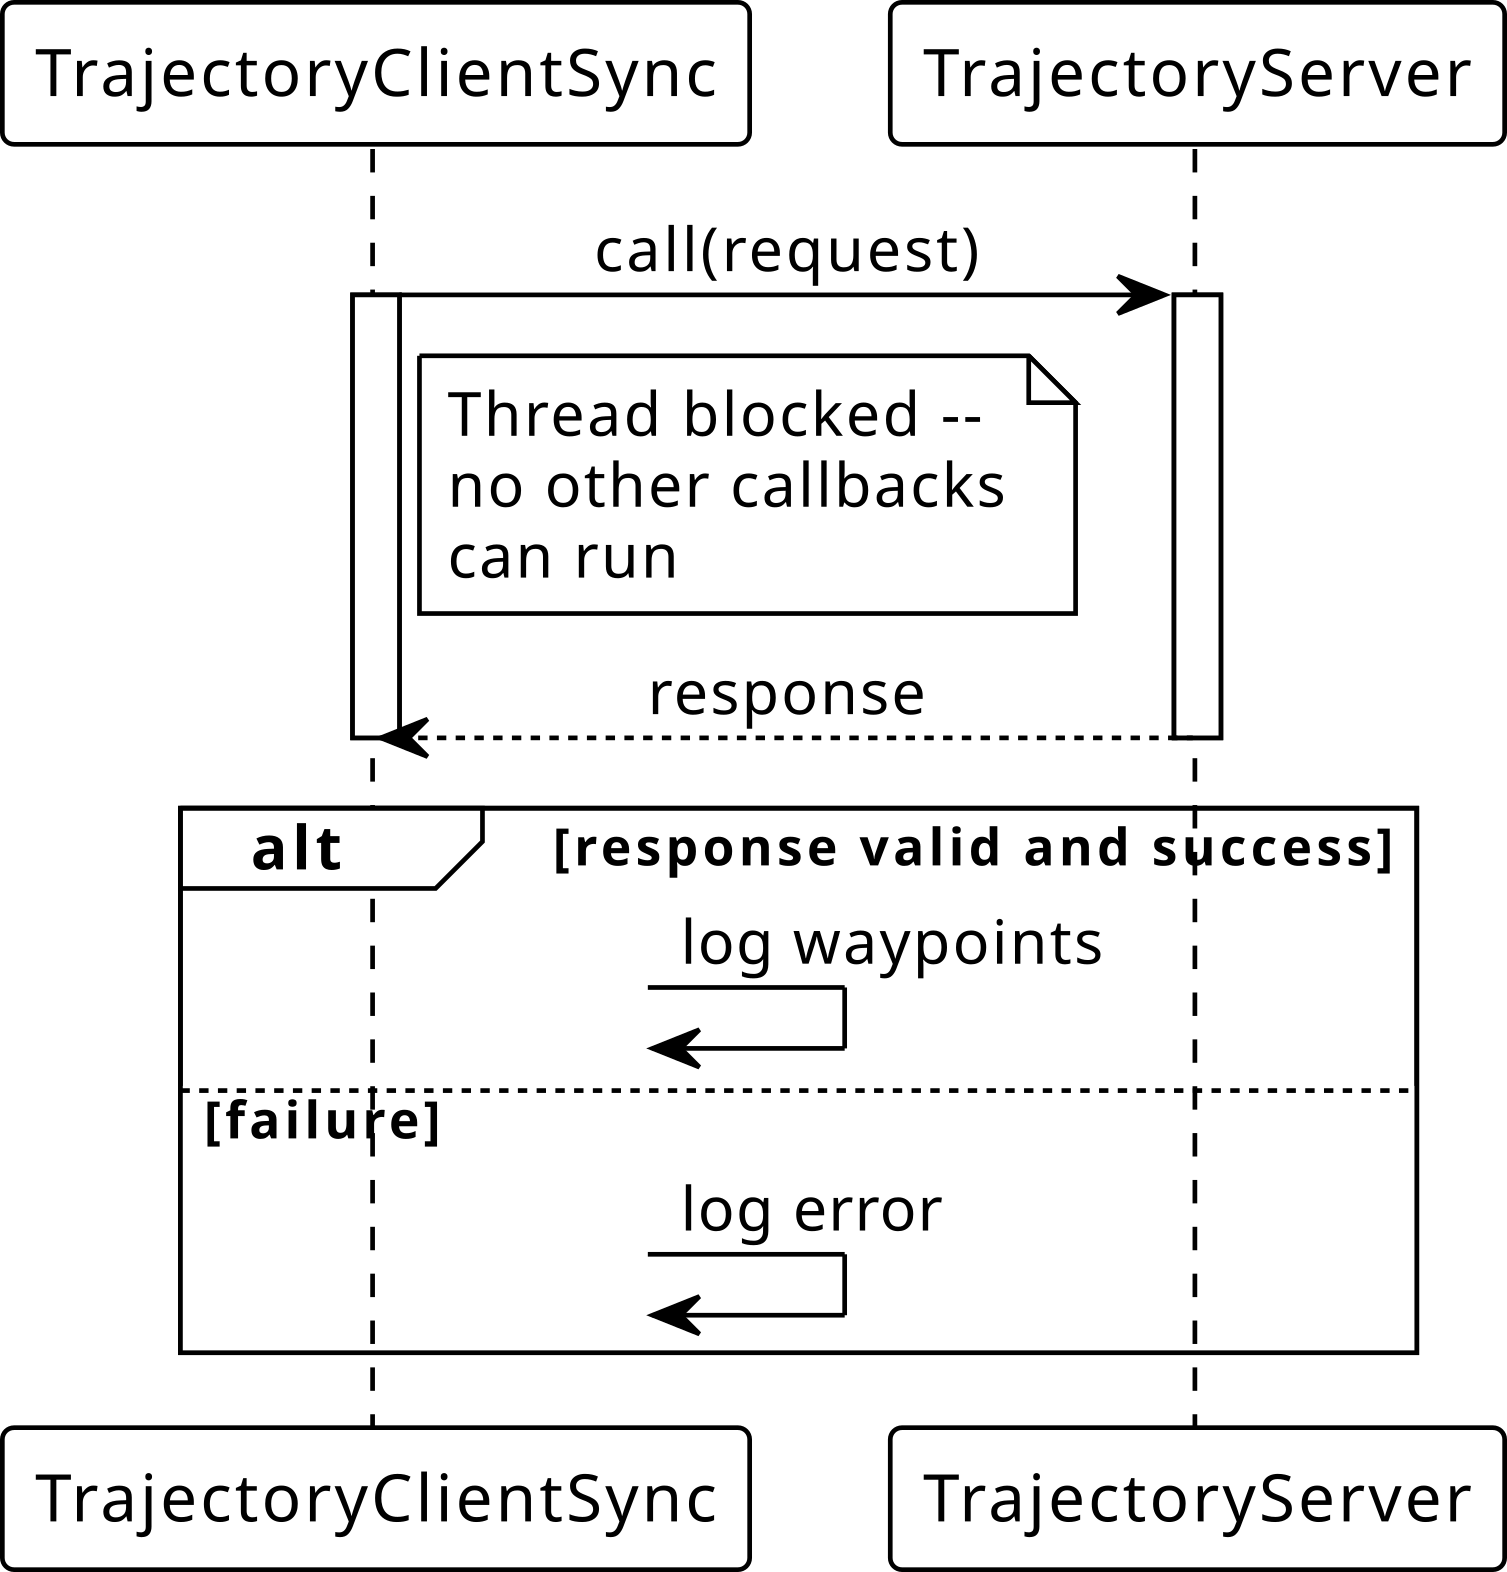
The synchronous client blocks the calling thread until the response arrives. This is simpler but requires careful executor and callback group setup to avoid deadlocks.
Sync Call Diagram
Sync Client Constructor
class TrajectoryClientSync(Node):
    def __init__(self, node_name: str) -> None:
        super().__init__(node_name)
        self._client_cb_group = MutuallyExclusiveCallbackGroup()
        self._client = self.create_client(
            ComputeTrajectory, "compute_trajectory",
            callback_group=self._client_cb_group
        )
        while not self._client.wait_for_service(timeout_sec=1.0):
            self.get_logger().info("Waiting for service...")

        self._timer = self.create_timer(2.0, self._timer_callback)

    def _timer_callback(self) -> None:
        self._send_request()
The client is placed in a separate callback group to avoid deadlocks with the timer.
wait_for_serviceblocks until the server is available.A timer calls
_send_requestevery 2 seconds.
Sending a Request (Sync)
def _send_request(self):
    request = ComputeTrajectory.Request()
    request.goal_pose.position.x = random.uniform(0.0, 10.0)
    request.max_velocity = 1.0
    self.get_logger().info("Sending synchronous request...")
    response = self._client.call(request)
    if response is not None and response.success:
        self.get_logger().info(f"Success: {response.message}")
        for i, wp in enumerate(response.waypoints):
            self.get_logger().info(
                f"  Waypoint {i}: ({wp.position.x}, "
                f"{wp.position.y}, {wp.position.z})")
Creates a
Requestobject and populates its fields.callsends the request and blocks until the response arrives.If the response is valid and successful, logs the waypoints.
Avoiding the Deadlock
call()blocks the current thread until the response arrives. If the timer callback and the service client share the same callback group, the executor cannot process the response while blocked – causing a deadlock.Fix 1: Place the client in a separate callback group so the response can be processed on a different thread.
Fix 2: Use a
MultiThreadedExecutorin the entry point so multiple threads are available.Both fixes are required together – a separate callback group without multiple threads still deadlocks.
Warning
Prefer call_async() in most cases. Use call() only when
blocking behavior is explicitly needed and the executor setup
supports it.
Sync Client Demonstration
# Terminal 1
ros2 run service_demo trajectory_server

# Terminal 2
ros2 run service_demo trajectory_client_sync
Asynchronous vs. Synchronous Comparison
Async ( |
Sync ( |
|
|---|---|---|
Blocking |
No |
Yes, until response arrives |
Response |
In |
Inline after |
Deadlock risk |
None |
Yes, without proper setup |
Executor |
Any |
|
Asynchronous (call_async())
Returns a
Futureimmediately (the node keeps spinning).Response is handled in
_response_callbackwhen it arrives.No risk of deadlock (no thread is ever blocked).
No special executor or callback group required.
Recommended for most use cases.
Synchronous (call())
Blocks the calling thread until the response arrives.
Response is handled inline (no callback needed).
Deadlock-prone if client and timer share the same callback group.
Requires a
MutuallyExclusiveCallbackGroupfor the client and aMultiThreadedExecutor.Use only when blocking behavior is explicitly required.
Actions#
Actions extend services with feedback and cancellation for long-running tasks: navigation, arm motion, image processing pipelines, etc.
Note
All demos are text-based – robot movement is simulated with log
messages and time.sleep(). No robot or simulator needed.
Action Communication Model
An action is a three-part communication pattern:
Goal – the client sends a goal to the server (e.g., “navigate to (5, 3)”).
Feedback – the server periodically publishes progress updates while executing (e.g., “distance remaining: 2.3 m”).
Result – when the task completes (or is canceled), the server returns a final result (e.g., “total distance: 7.1 m”).
Actions are built on top of services and topics internally:
A service for sending goals and receiving acceptance/rejection
A service for querying the result
A service for canceling goals
A topic for publishing feedback
When to Use Actions vs. Services
Service |
Action |
|
|---|---|---|
Duration |
Short (< 1 s) |
Long (seconds to minutes) |
Feedback |
None |
Periodic progress updates |
Cancellation |
Not possible |
Built-in cancel request |
Examples |
Spawn model, get map |
Navigate to goal, pick & place |
Writing an Action Server#
An action server handles incoming goals, publishes feedback during execution, and returns a result.
In this demo we simulate navigation with a countdown loop – no actual robot is moving.
Server Constructor
import time
from rclpy.action import ActionServer
from rclpy.node import Node
from custom_interfaces.action import Navigate

class NavigateServer(Node):
    def __init__(self):
        super().__init__("navigate_server")
        self._action_server = ActionServer(
            self, Navigate, "navigate",
            self._execute_callback,
        )
        self.get_logger().info("Navigate action server ready.")
ActionServertakes the node, action type, action name, and execute callback._execute_callbackis called when a goal is accepted.
What is goal_handle (Server Side)?
The framework passes a ServerGoalHandle to the execute callback.
It is the server’s interface to a specific goal.
Attribute / Method |
Purpose |
|---|---|
|
Access the goal data sent by the client |
|
Send a feedback update to the client |
|
Mark the goal as succeeded |
|
Mark the goal as canceled |
|
Mark the goal as aborted (failure) |
|
|
Note
You must call exactly one of succeed(), canceled(), or
abort() before returning from the execute callback. This sets
the terminal state the client receives.
Publishing Feedback
def _execute_callback(self, goal_handle):
    self.get_logger().info(
        f"Navigating to "
        f"({goal_handle.request.target_pose.position.x}, "
        f"{goal_handle.request.target_pose.position.y})"
    )
    feedback = Navigate.Feedback()
    total_distance = 10.0
    for i in range(10):
        feedback.distance_remaining = total_distance - (i + 1)
        feedback.percent_complete = float((i + 1) * 10)
        goal_handle.publish_feedback(feedback)
        self.get_logger().info(
            f"Progress: {feedback.percent_complete:.0f}%")
        time.sleep(1.0)
goal_handle.requestcontains the goal data sent by the client.A
Feedbackobject is created and published at each iteration.publish_feedbacksends progress updates to the client in real time.
Handling Cancellation and Returning the Result
    # Inside the for loop
    if goal_handle.is_cancel_requested:
        goal_handle.canceled()
        self.get_logger().info("Navigation canceled.")
        result = Navigate.Result()
        result.success = False
        return result

# After the loop completes
goal_handle.succeed()
result = Navigate.Result()
result.success = True
result.total_distance = total_distance
result.elapsed_time = 10.0
return result
Each iteration checks
is_cancel_requestedand callsgoal_handle.canceled()if true.On completion,
goal_handle.succeed()sets the terminal state.A
Resultobject is populated and returned in both cases.
Entry Point – Why MultiThreadedExecutor?
import rclpy
from rclpy.executors import MultiThreadedExecutor

def main(args=None):
    rclpy.init(args=args)
    node = NavigateServer("navigate_server")
    executor = MultiThreadedExecutor()
    executor.add_node(node)
    executor.spin()
The execute callback contains
time.sleep(), which blocks its thread.With a
SingleThreadedExecutor, the cancel callback cannot run while the execute callback is sleeping – the cancel request is never seen, causing the goal to run to completion.MultiThreadedExecutorallows the cancel callback to run on a separate thread, so cancellation works during blocking operations.
Single-Threaded vs. Multi-Threaded Executor
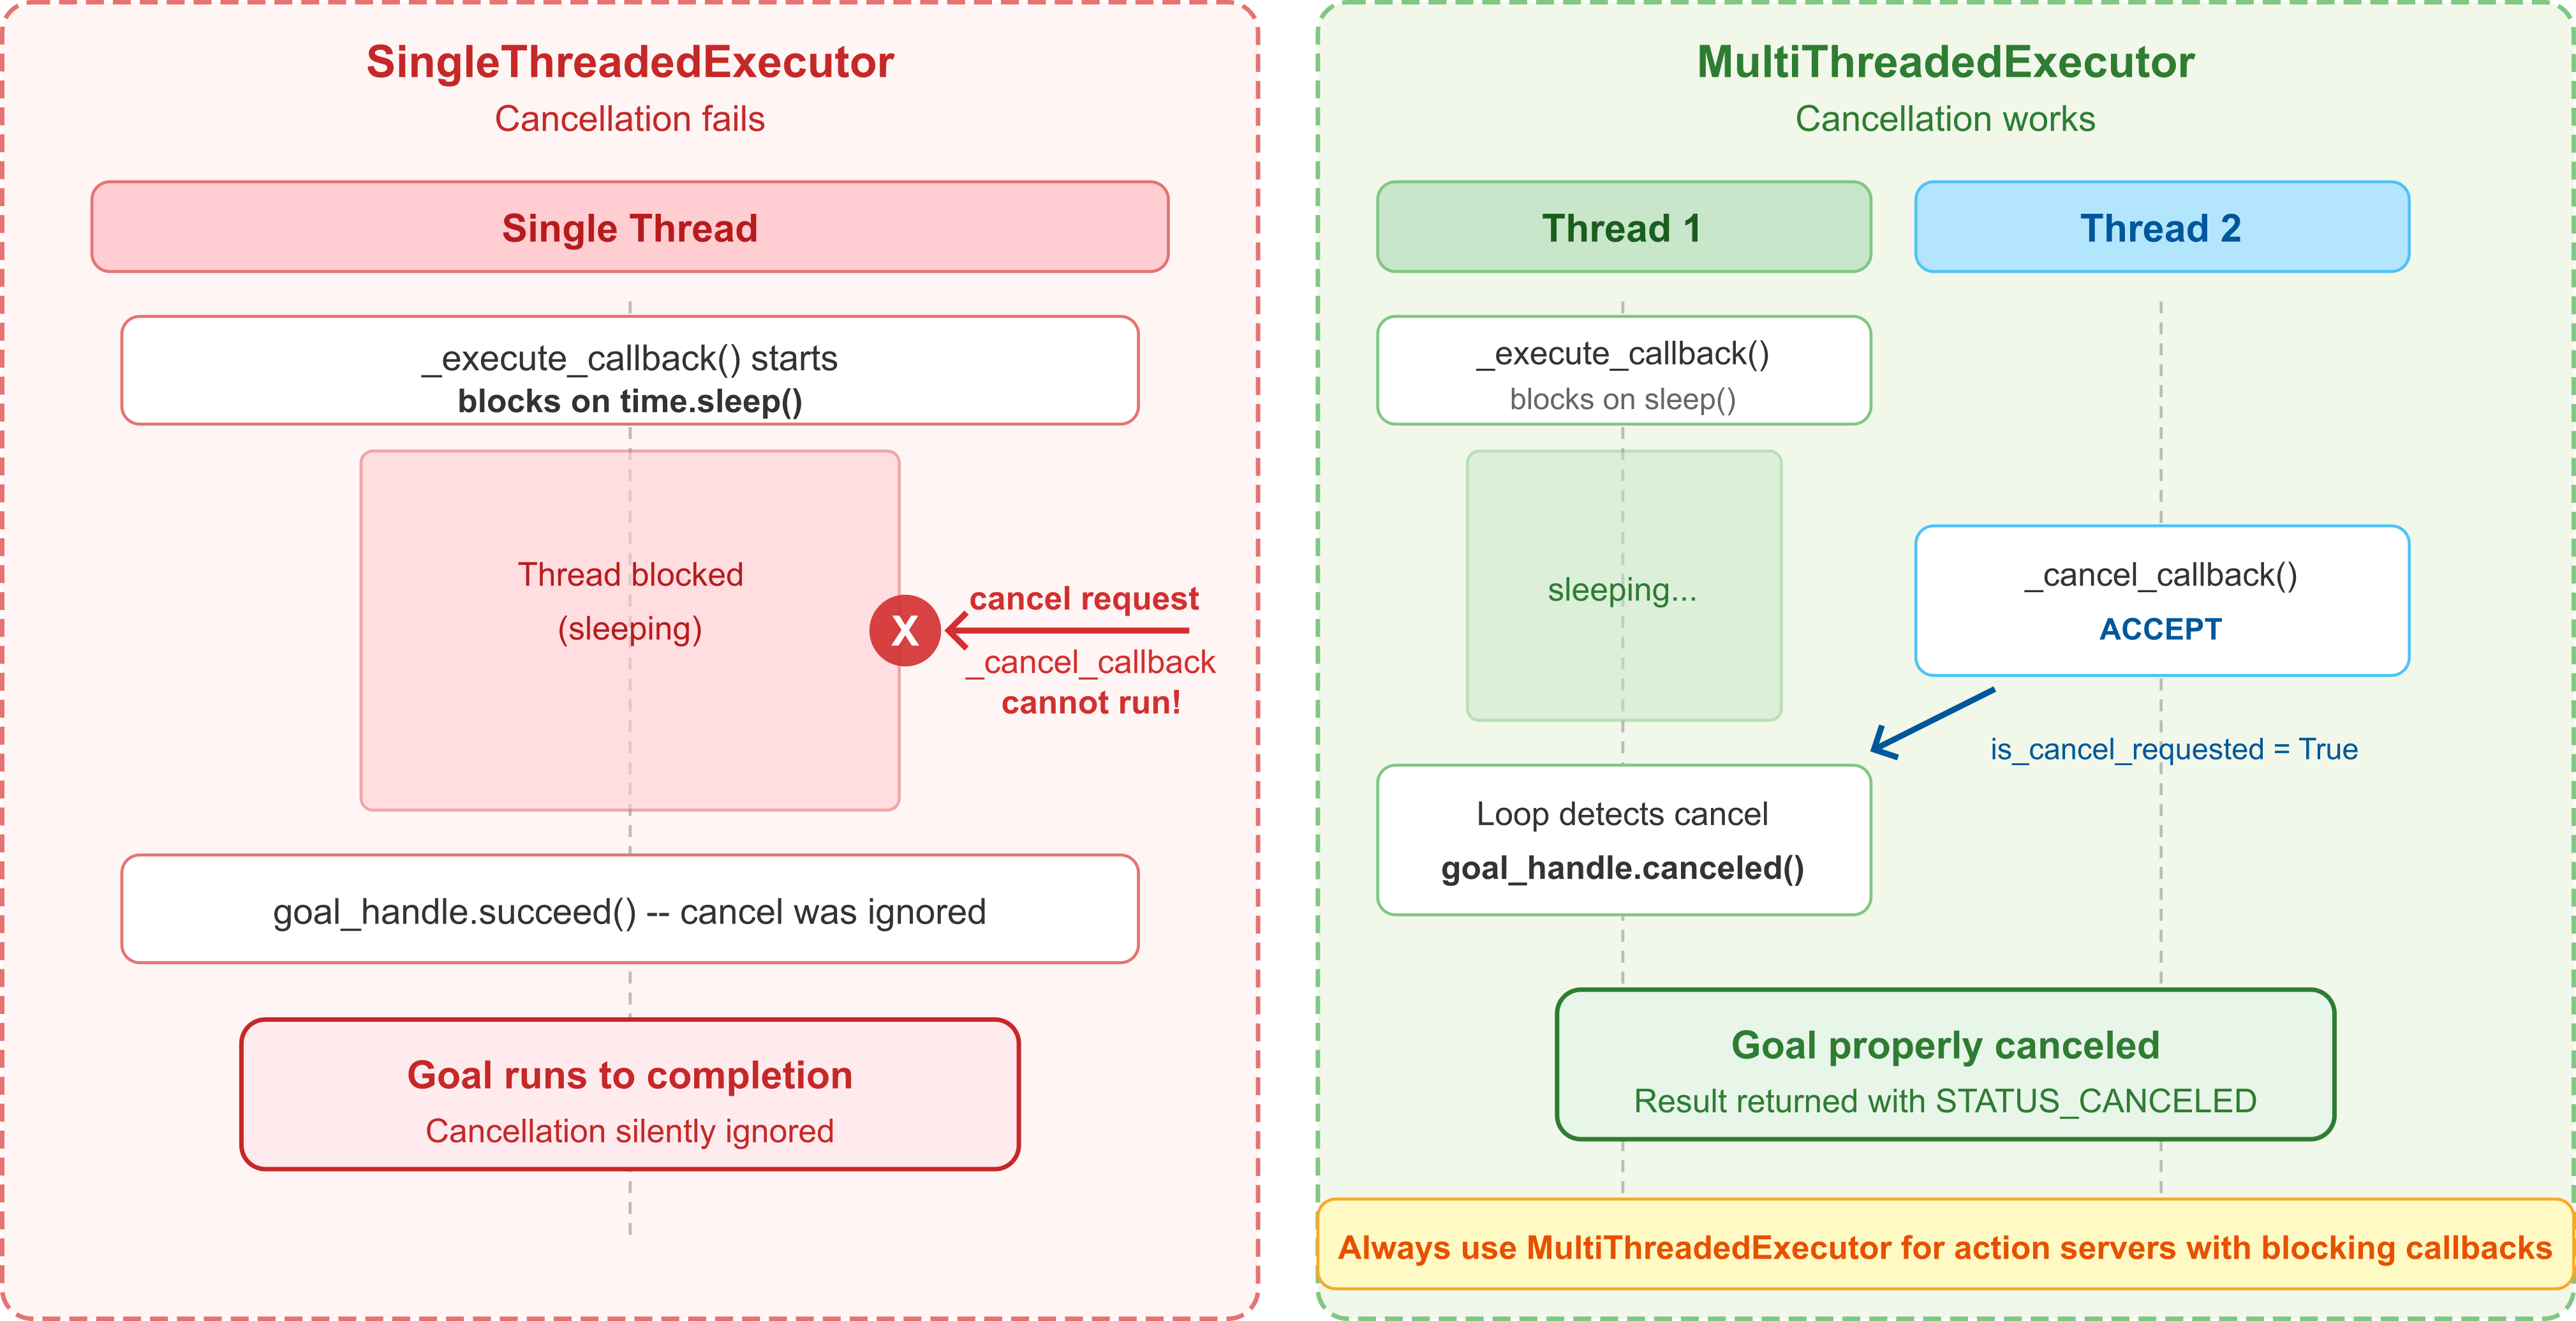
Fig. 76 Single-threaded vs. multi-threaded executor: with a single thread, the cancel callback cannot run while the execute callback is blocking. A multi-threaded executor allows both to run concurrently.#

Fig. 77 Single-threaded vs. multi-threaded executor: with a single thread, the cancel callback cannot run while the execute callback is blocking. A multi-threaded executor allows both to run concurrently.#
Action Server Demonstration
# Terminal 1
ros2 run action_demo navigate_server

# Terminal 2
ros2 action list
ros2 action type /navigate
ros2 action info /navigate
Goal Handling and Cancellation#
By default, every incoming goal is automatically accepted. Override
goal_callback and cancel_callback for finer control over which
goals to accept and whether cancellation requests are honored.
Registering Goal and Cancel Callbacks
from rclpy.action import CancelResponse, GoalResponse

class NavigateServerAdvanced(Node):
    def __init__(self):
        super().__init__("navigate_server_adv")
        self._action_server = ActionServer(
            self, Navigate, "navigate",
            execute_callback=self._execute_callback,
            goal_callback=self._goal_callback,
            cancel_callback=self._cancel_callback,
        )
goal_callbackis called before execution to accept or reject a goal.cancel_callbackis called when a client requests cancellation.execute_callbackruns the actual work (same as before).
Goal Validation
def _goal_callback(self, goal_request):
    """Accept or reject a goal before execution."""
    if goal_request.max_speed <= 0.0:
        self.get_logger().warn(
            "Rejected: speed must be positive.")
        return GoalResponse.REJECT
    self.get_logger().info("Goal accepted.")
    return GoalResponse.ACCEPT
Called before the execute callback – the goal never starts if rejected.
GoalResponse.ACCEPT/GoalResponse.REJECTcontrol whether the goal enters execution.Use this to validate goal fields (speed, bounds, etc.).
Cancel Policy
def _cancel_callback(self, goal_handle):
    """Accept or reject a cancellation request."""
    self.get_logger().info(
        "Cancel request received -- accepting.")
    return CancelResponse.ACCEPT
CancelResponse.ACCEPTtells the framework to mark the goal as cancel-requested.CancelResponse.REJECTwould refuse the cancel (e.g., during a critical operation).
Warning
Cancellation is cooperative. The cancel callback only accepts
the request. The execute callback must check
goal_handle.is_cancel_requested in its loop and call
goal_handle.canceled() to actually stop.
Writing an Action Client#
An action client sends a goal, receives feedback updates, and retrieves
the final result. The entire flow is asynchronous: each step returns a
Future and the node continues spinning.
Tip
You can call an action directly from the CLI without writing a client node.
Creating the Client
from rclpy.action import ActionClient
from custom_interfaces.action import Navigate

class NavigateClient(Node):
    def __init__(self):
        super().__init__("navigate_client")
        self._client = ActionClient(
            self,
            Navigate,
            "navigate"
        )
ActionClienttakes the node, action type, and action name.The action name must match the server’s action name.
Sending a Goal
def send_goal(self, x, y):
    self.get_logger().info("Waiting for action server...")
    self._client.wait_for_server()
    goal = Navigate.Goal()
    goal.target_pose.position.x = x
    goal.target_pose.position.y = y
    goal.max_speed = 1.0

    future = self._client.send_goal_async(
        goal,
        feedback_callback=self._feedback_callback)

    future.add_done_callback(self._goal_response_callback)
wait_for_server()blocks until the action server is available.send_goal_async()sends the goal and returns aFuture.feedback_callbackis called each time the server publishes feedback.add_done_callbackregisters_goal_response_callbackto be invoked when the server accepts or rejects the goal.
Action Client Callbacks Overview
_goal_response_callback: Invoked when the server accepts or rejects the goal. If accepted, stores the goal handle and registers
_result_callbackviaget_result_async()._feedback_callback: Invoked each time the server publishes intermediate feedback. Logs progress and, if
cancel_and_resendis set and five feedback messages have been received, initiates a cancellation viacancel_goal_async()._cancel_done_callback: Invoked when the server responds to a cancellation request. Logs whether the cancellation was accepted or rejected and resets
self._cancelingif rejected._result_callback: Invoked once when the goal reaches a terminal state. Logs the outcome for
STATUS_SUCCEEDED, triggers a new goal viasend_goal()forSTATUS_CANCELED, and logs a warning otherwise.
Goal Response Callback Sequence
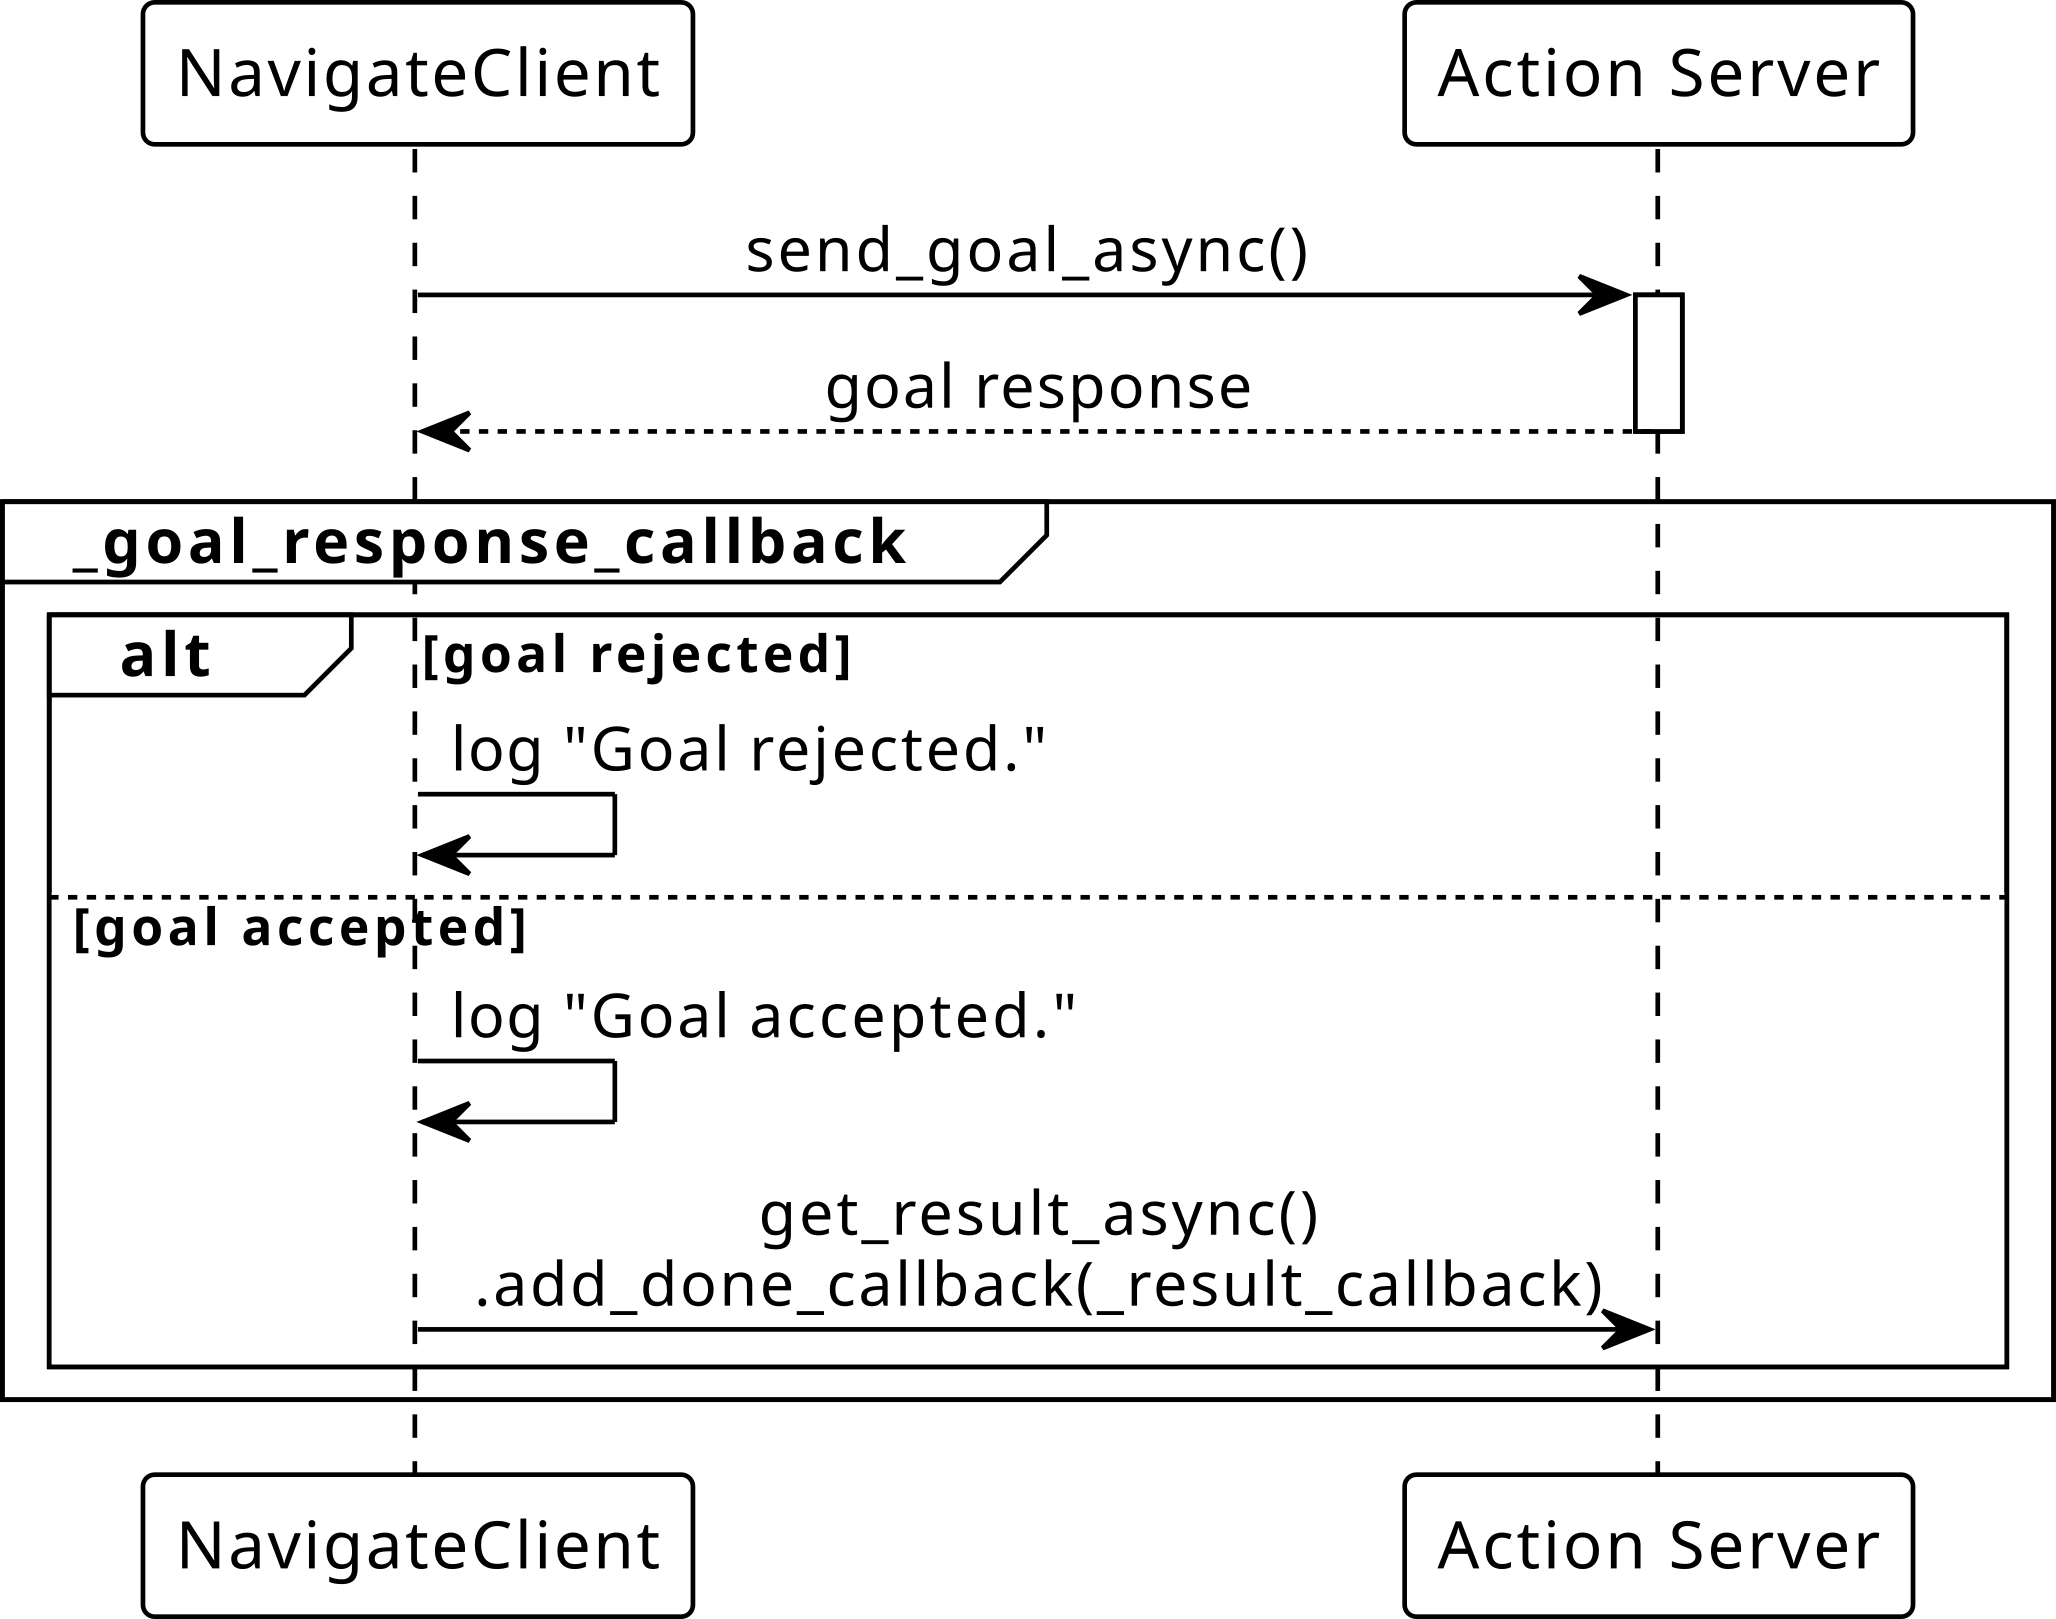
Fig. 78 Sequence diagram for _goal_response_callback: invoked once
after send_goal_async() completes, branching on whether the
server accepted or rejected the goal.#
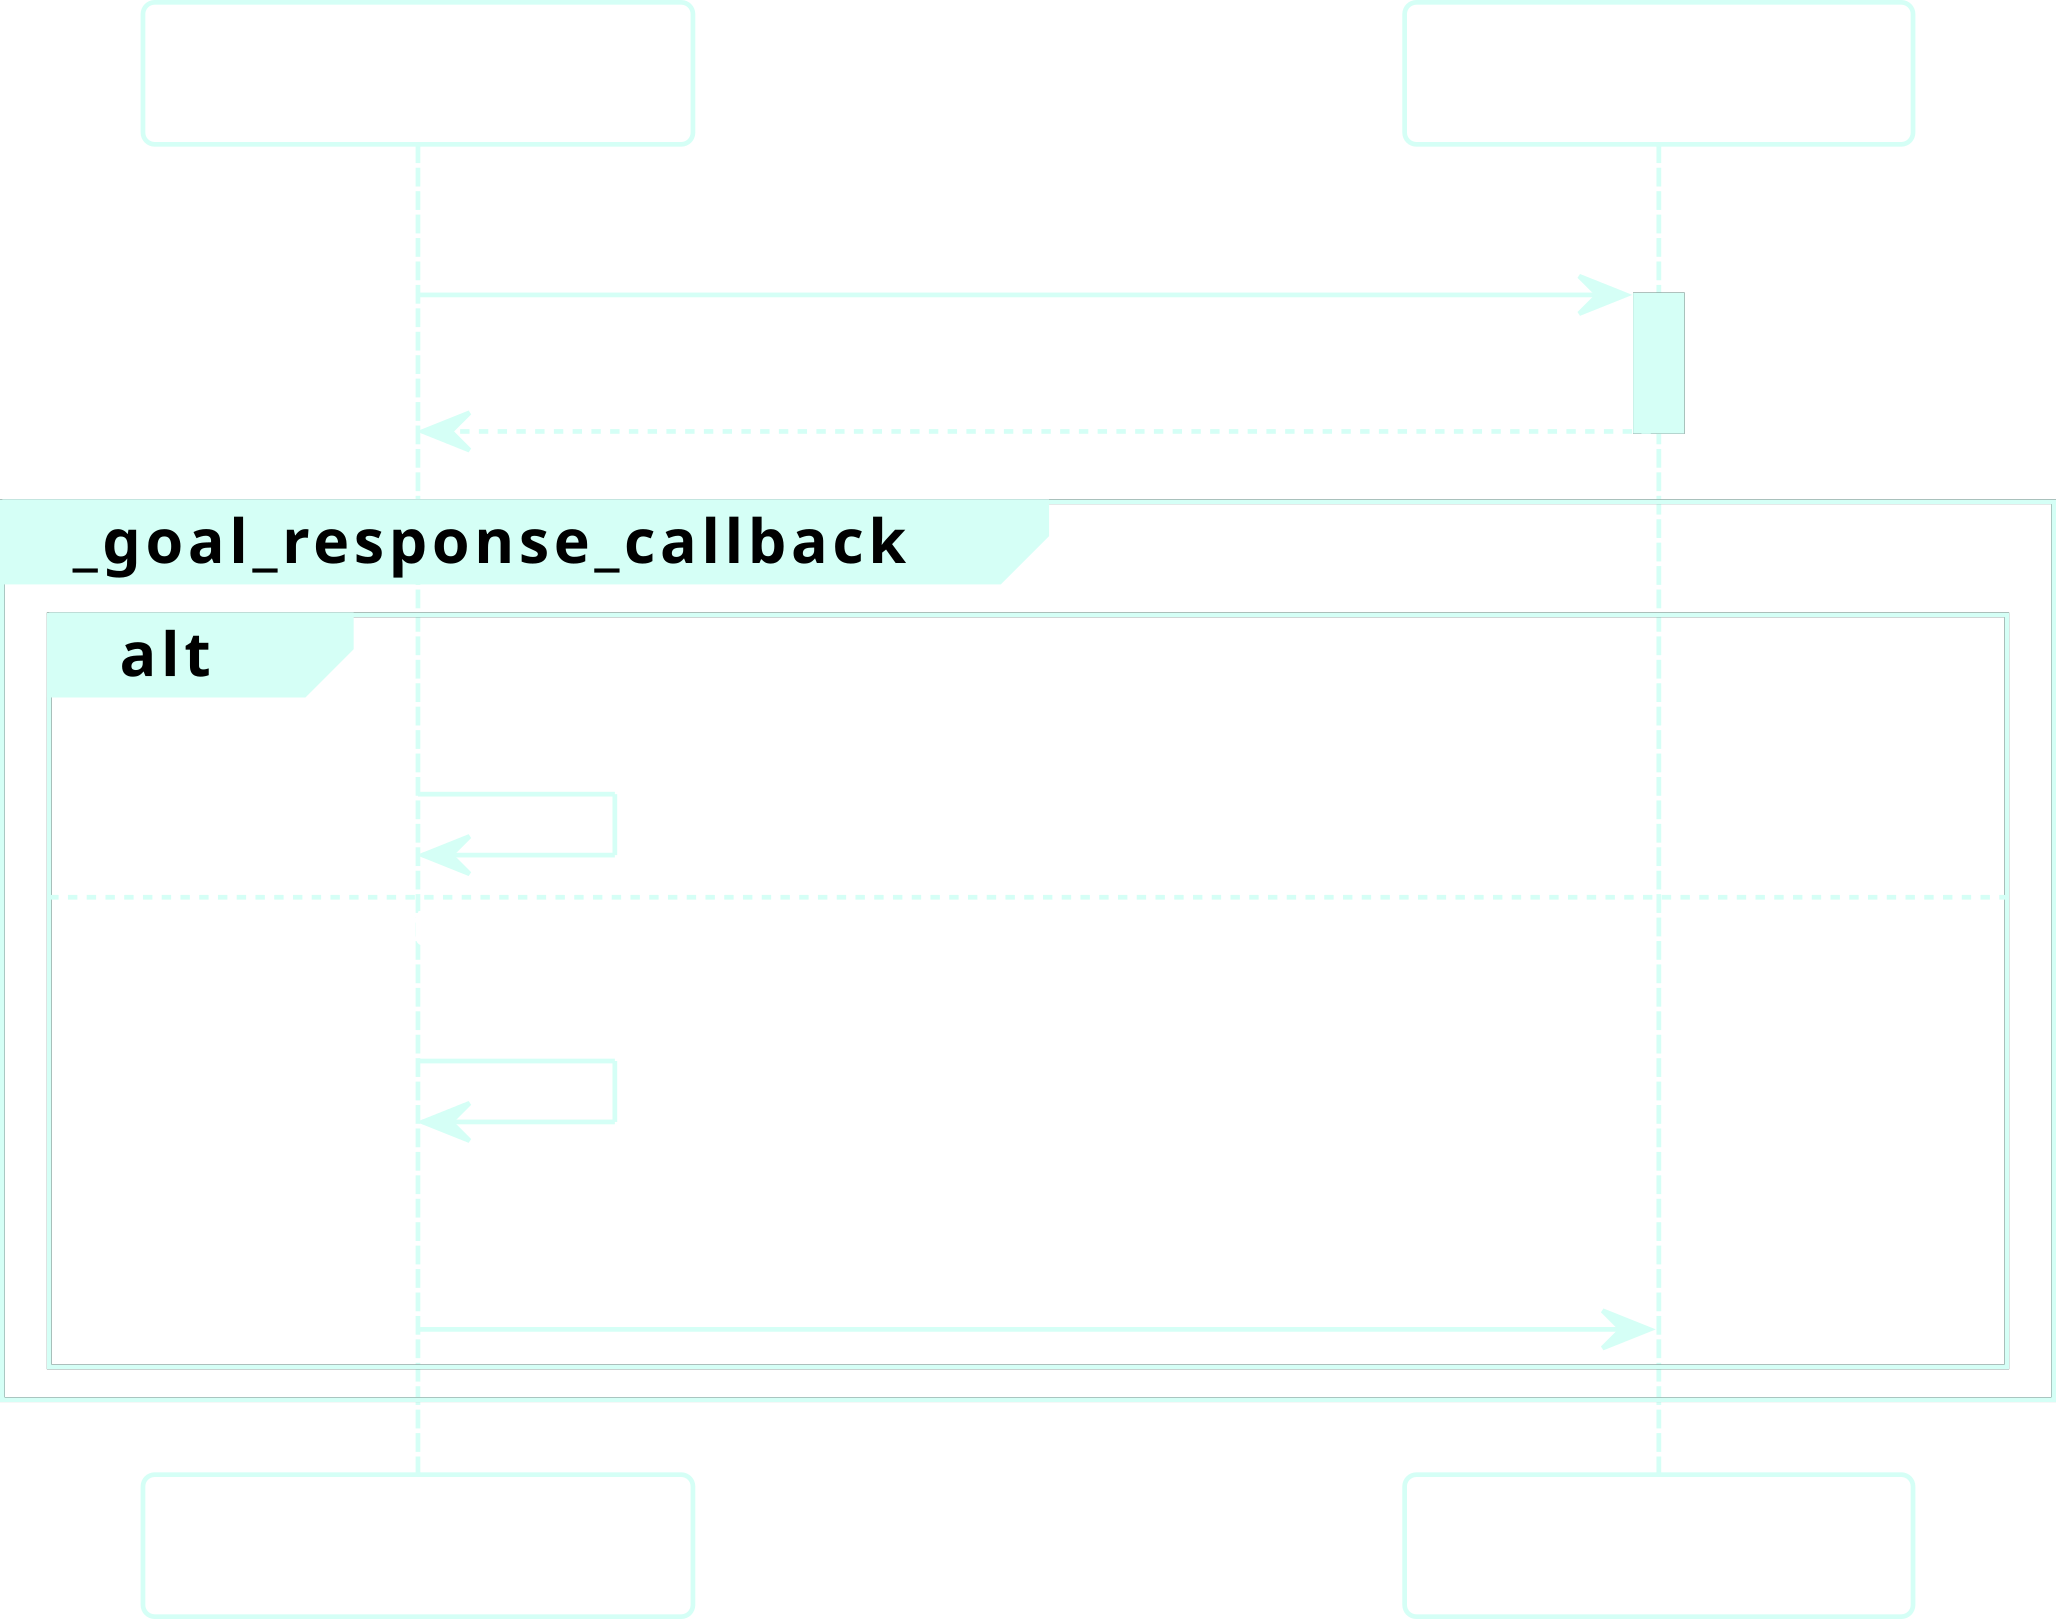
Fig. 79 Sequence diagram for _goal_response_callback: invoked once
after send_goal_async() completes, branching on whether the
server accepted or rejected the goal.#
Handling the Goal Response
def _goal_response_callback(self, future):
    goal_handle = future.result()
    if not goal_handle.accepted:
        self.get_logger().error("Goal rejected.")
        return
    # Log confirmation that the server accepted the goal
    self.get_logger().info("Goal accepted.")
    # Store the goal handle so other callbacks can cancel the goal
    self._goal_handle = goal_handle
    # Request the final result asynchronously and register a callback
    goal_handle.get_result_async().add_done_callback(
        self._result_callback)
future.result()returns aClientGoalHandle.Check
goal_handle.acceptedto see if the server accepted the goal.Store
self._goal_handle– needed later for cancellation.get_result_async()returns anotherFuturefor the final result.
What is goal_handle (Client Side)?
On the client, future.result() from send_goal_async returns a
ClientGoalHandle. This is a different type from the server’s
ServerGoalHandle (it is the client’s reference to a specific
goal).
Attribute / Method |
Purpose |
|---|---|
|
|
|
Request the final result (returns a |
|
Send a cancellation request (returns a |
Warning
Store self._goal_handle = goal_handle in your goal response
callback. Without it, you cannot request the result or cancel the
goal later.
Feedback Callback Sequence
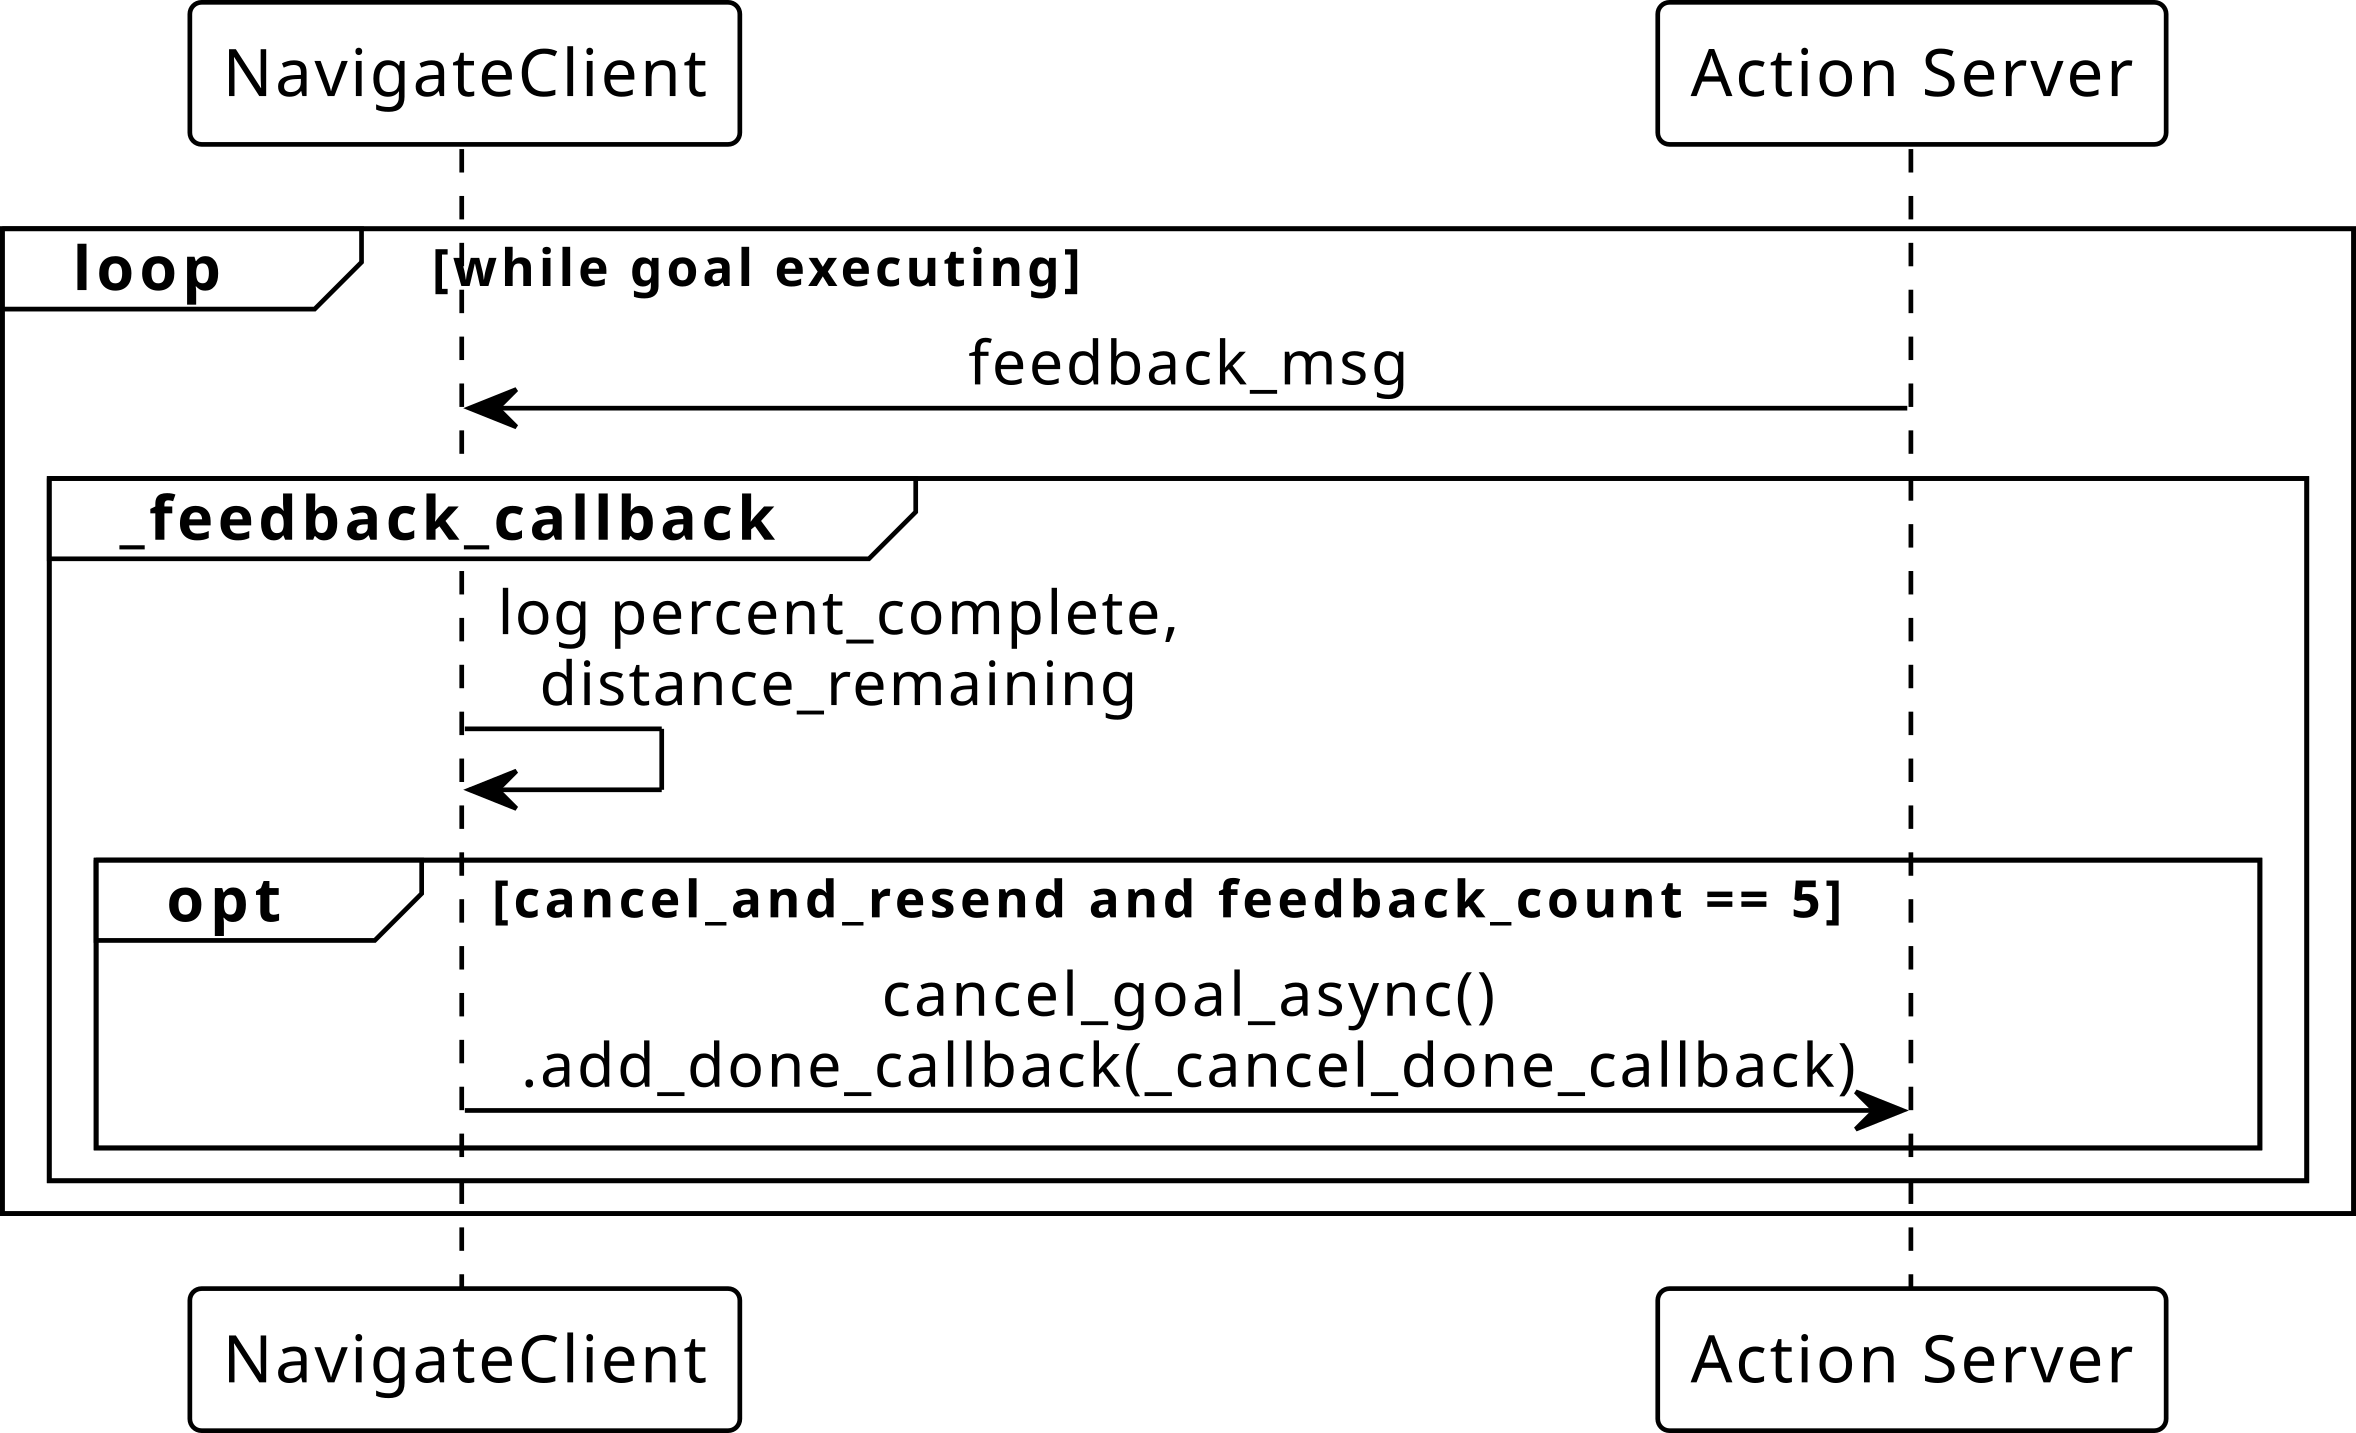
Fig. 80 Sequence diagram for _feedback_callback: invoked repeatedly
while the goal is executing, logging progress and optionally
triggering a cancellation after five feedback messages.#
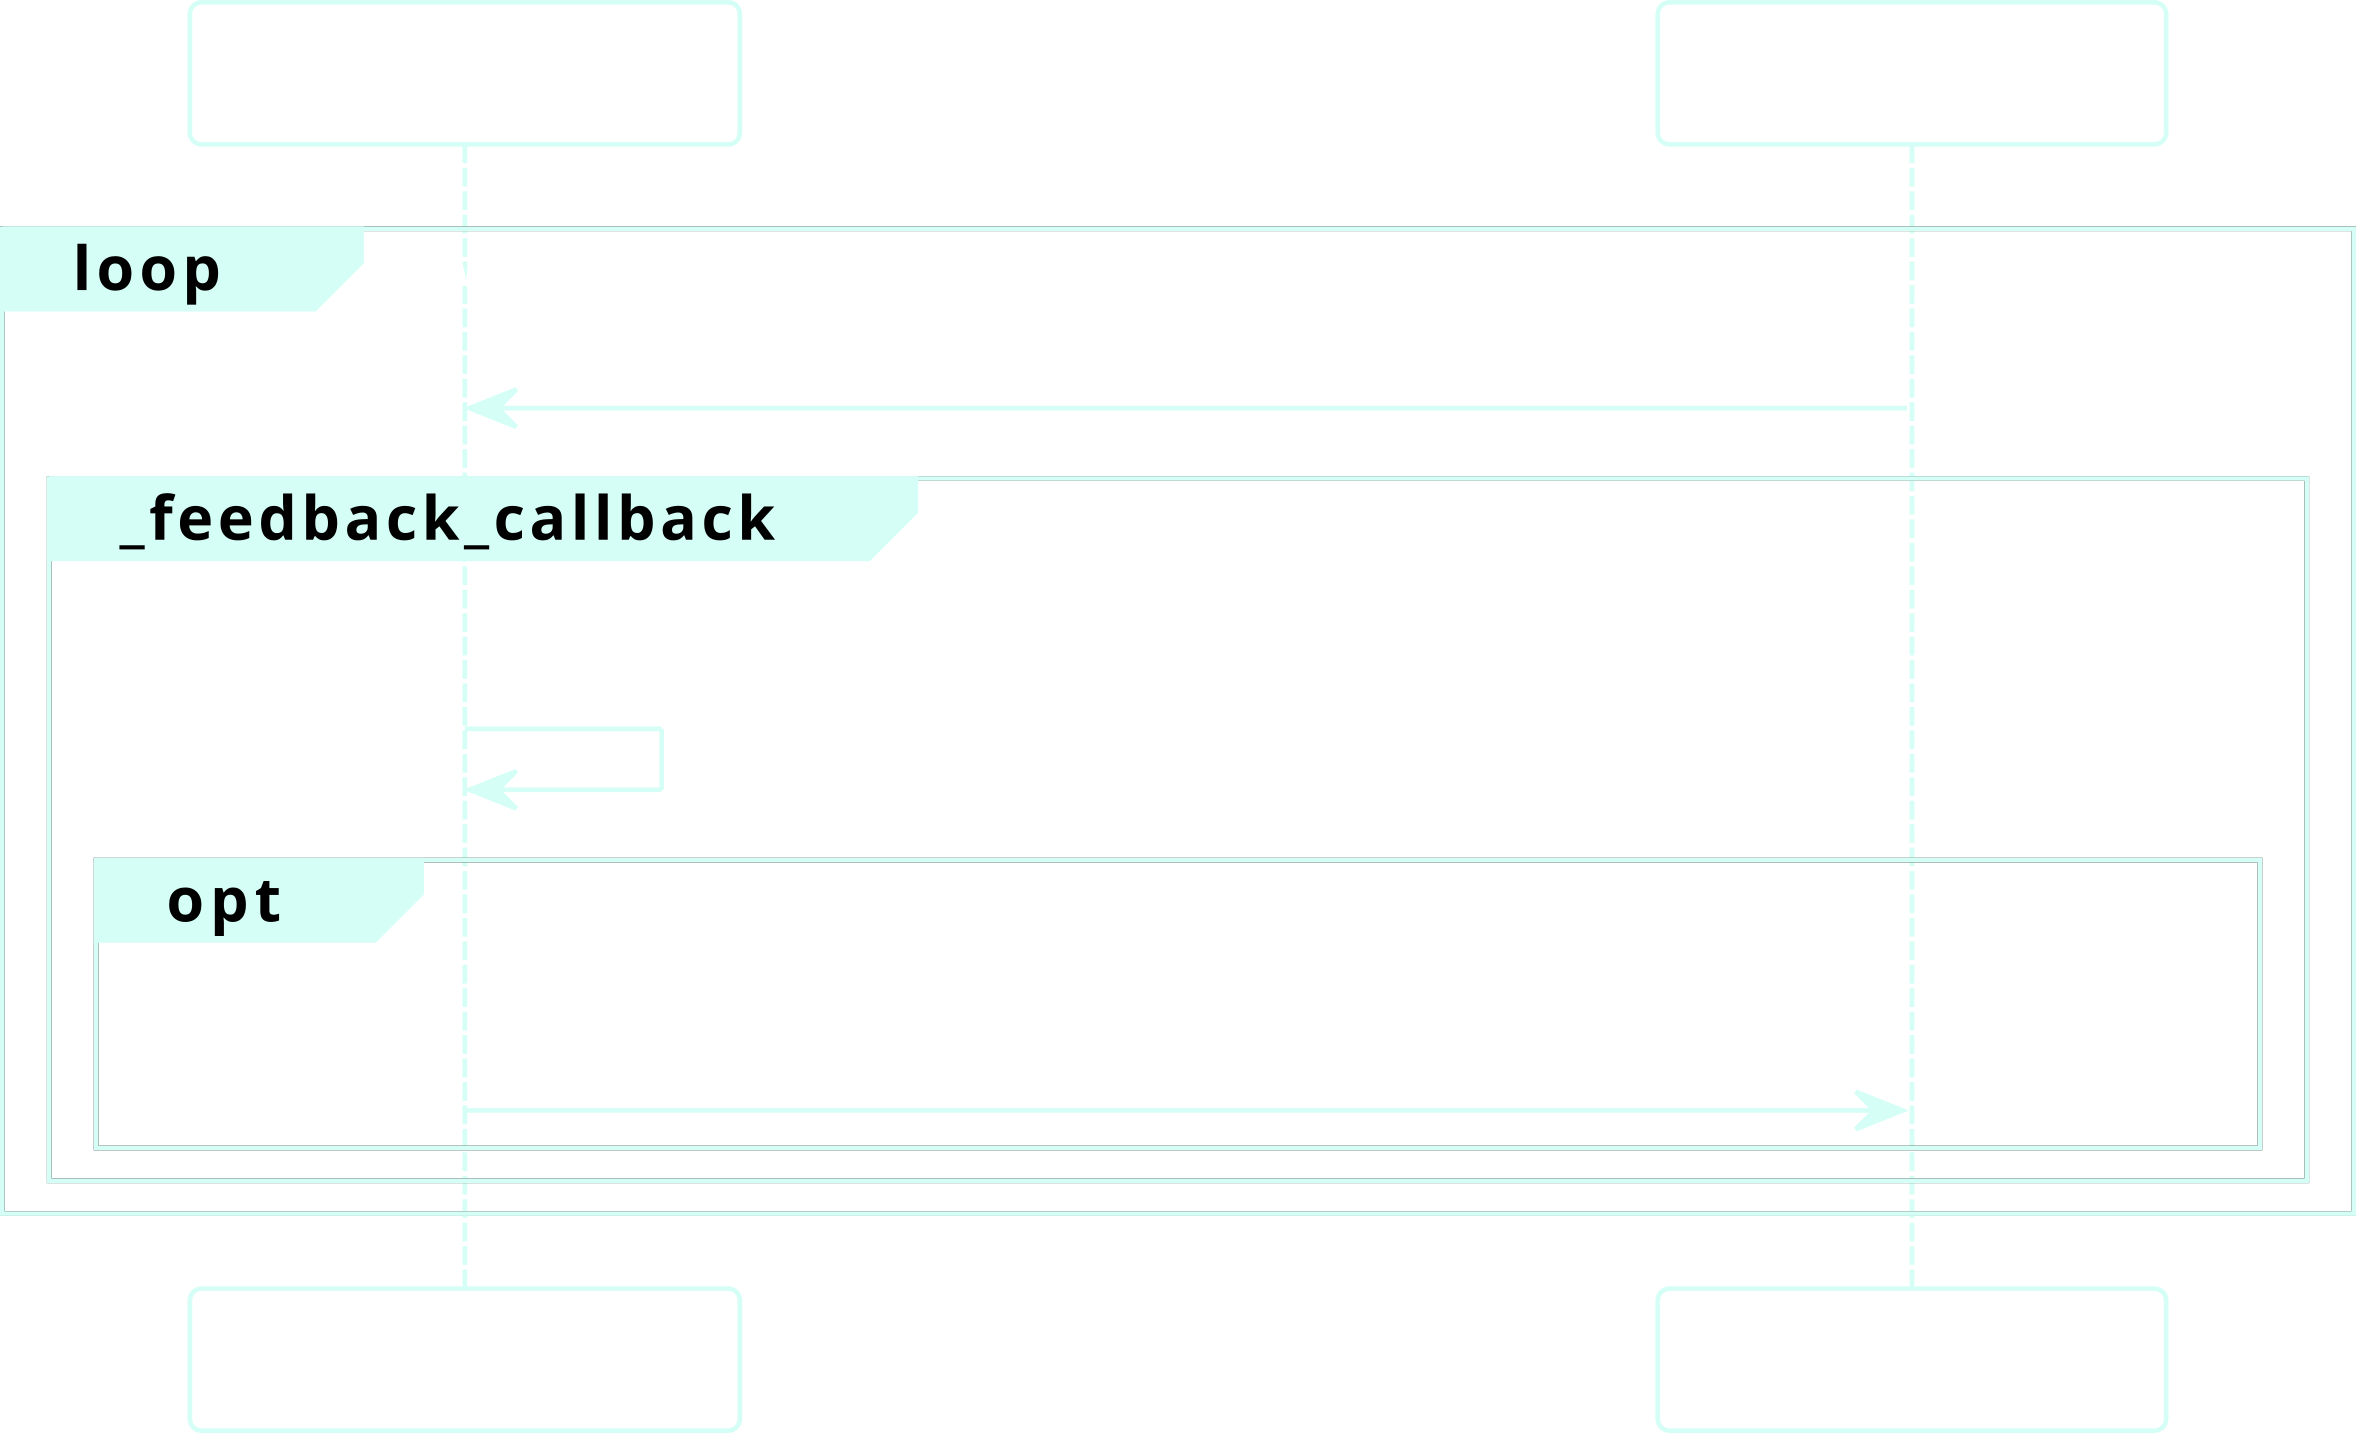
Fig. 81 Sequence diagram for _feedback_callback: invoked repeatedly
while the goal is executing, logging progress and optionally
triggering a cancellation after five feedback messages.#
Feedback Callback
def _feedback_callback(self, feedback_msg):
    fb = feedback_msg.feedback
    self.get_logger().info(
        f"Feedback: {fb.percent_complete:.0f}% complete, "
        f"{fb.distance_remaining:.1f} m remaining")

    self._feedback_count += 1
    if (self._cancel_and_resend
            and not self._canceling
            and self._feedback_count == 5
            and self._goal_handle is not None):
        self._canceling = True
        self.get_logger().info("Canceling goal after 5 feedback messages...")
        cancel_future = self._goal_handle.cancel_goal_async()
        cancel_future.add_done_callback(self._cancel_done_callback)
Invoked each time the server calls
publish_feedback.Access the actual feedback data via
feedback_msg.feedback.After five messages, cancellation is requested via
cancel_goal_async().
Requesting Cancellation
# self._goal_handle was stored in _goal_response_callback
cancel_future = self._goal_handle.cancel_goal_async()
cancel_future.add_done_callback(self._cancel_done_callback)
cancel_goal_async()sends a cancel request and returns aFuture.The
_goal_handlemust have been saved from_goal_response_callback.
Cancel Done Callback Sequence

Fig. 82 Sequence diagram for _cancel_done_callback: invoked once after
cancel_goal_async() completes, branching on whether the server
accepted or rejected the cancellation request.#
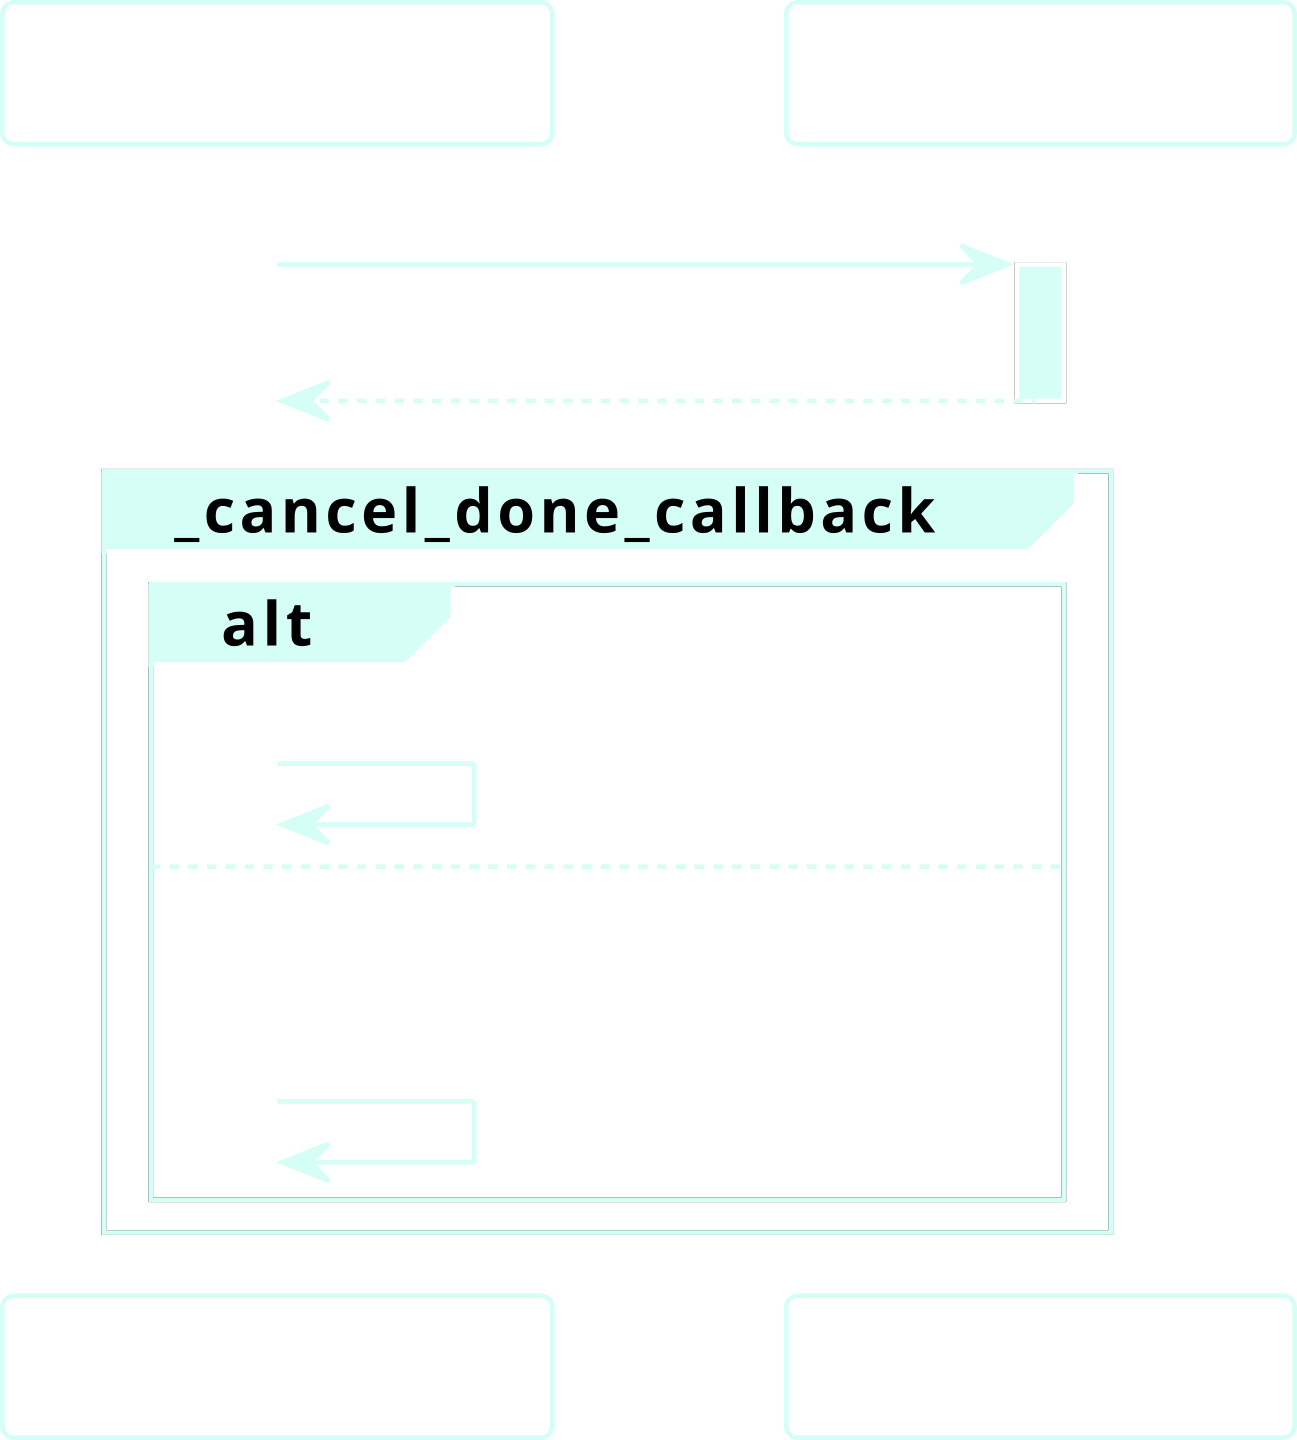
Fig. 83 Sequence diagram for _cancel_done_callback: invoked once after
cancel_goal_async() completes, branching on whether the server
accepted or rejected the cancellation request.#
Handling the Cancel Response
def _cancel_done_callback(self, future):
    cancel_response = future.result()
    if len(cancel_response.goals_canceling) > 0:
        self.get_logger().info("Cancel accepted by server.")
    else:
        self.get_logger().warn("Cancel request was rejected.")
        self._canceling = False
goals_cancelinglists goals the server agreed to cancel.The actual result (with
STATUS_CANCELED) arrives later in_result_callback.
Note
The cancel response only confirms the server accepted the request.
The goal is not fully canceled until the execute callback checks
is_cancel_requested, calls goal_handle.canceled(), and
returns the result.
Result Callback Sequence
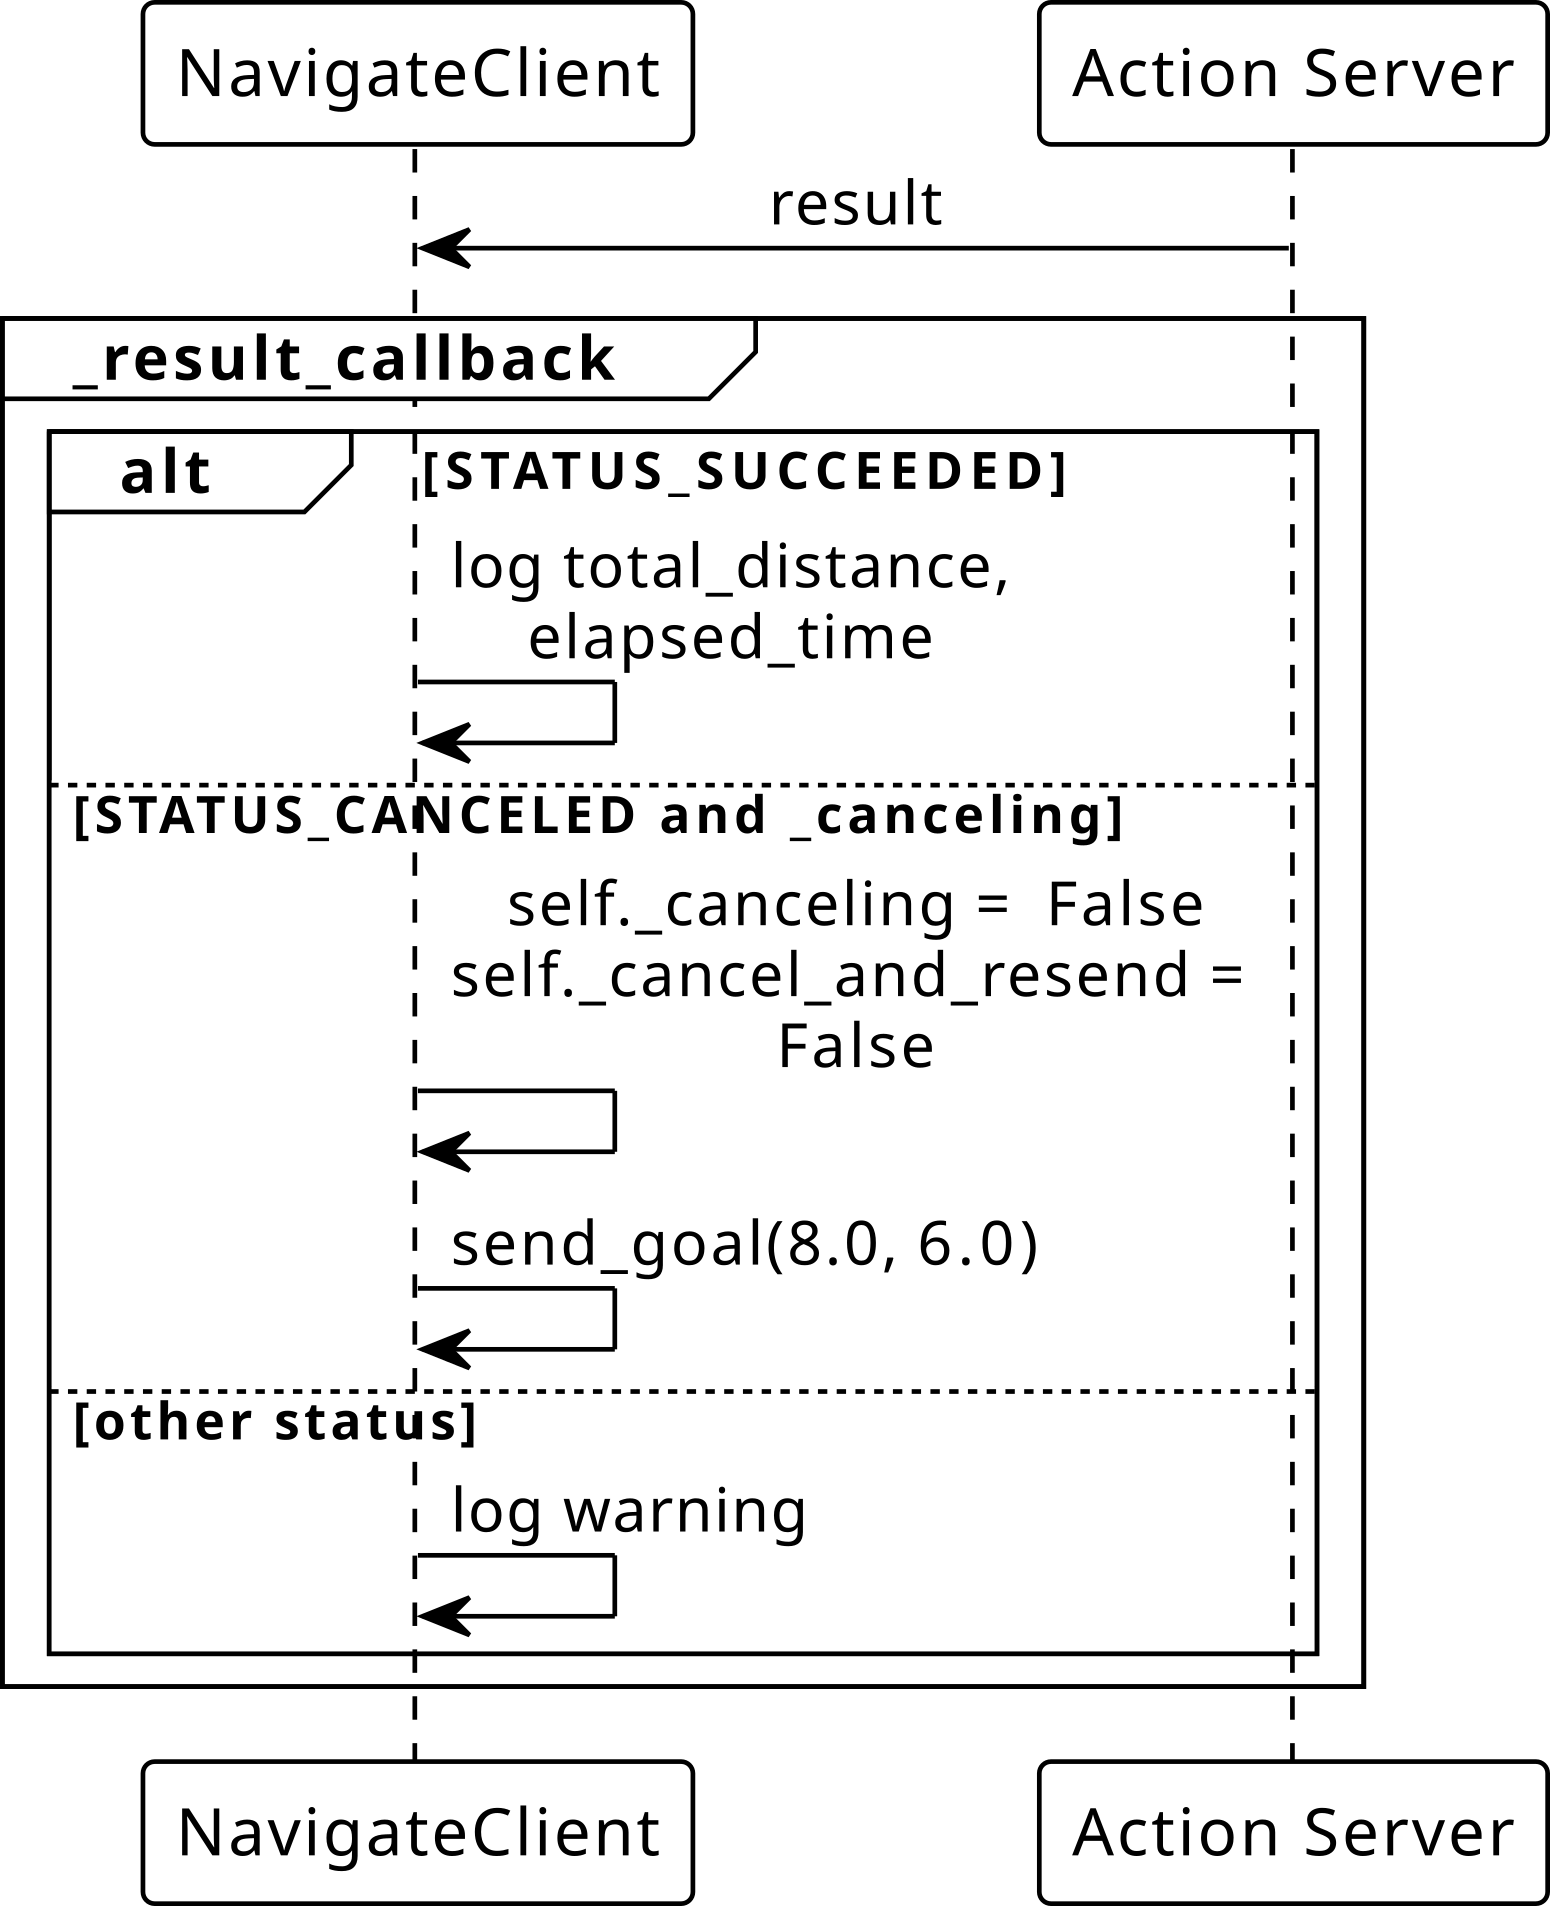
Fig. 84 Sequence diagram for _result_callback: invoked once when the
goal reaches a terminal state, branching on STATUS_SUCCEEDED,
STATUS_CANCELED, or any other status.#
Fig. 85 Sequence diagram for _result_callback: invoked once when the
goal reaches a terminal state, branching on STATUS_SUCCEEDED,
STATUS_CANCELED, or any other status.#
Result Callback
def _result_callback(self, future):
    result = future.result().result
    status = future.result().status
    if status == GoalStatus.STATUS_SUCCEEDED:
        self.get_logger().info(
            f"Done! Distance: {result.total_distance:.1f}"
            f" m, Time: {result.elapsed_time:.1f} s")
    elif status == GoalStatus.STATUS_CANCELED:
        self.get_logger().info("Goal was canceled.")
        if self._canceling:
            self._canceling = False
            self._cancel_and_resend = False
            self.get_logger().info("Sending new goal...")
            self.send_goal(8.0, 6.0)
    else:
        self.get_logger().warn(
            f"Navigation failed with status: {status}")
future.result().result– theResultobject from the server.future.result().status– the terminal status (SUCCEEDED,CANCELED,ABORTED).Always check
statusrather than just the result fields.
Full Cancellation Flow
Client calls
cancel_goal_async()– cancel request sent to server.Server’s
_cancel_callbackreturnsCancelResponse.ACCEPT.Client’s
_cancel_done_callbackfires – cancel was accepted.Server’s execute loop checks
is_cancel_requested, callsgoal_handle.canceled(), returns result.Client’s
_result_callbackfires withSTATUS_CANCELED.
Warning
The server’s execute callback must be running on a different
thread from the cancel callback. Use a
MultiThreadedExecutor for the server – otherwise the cancel
callback cannot run while the execute callback is blocking, and
the goal will run to completion.
Action Client Demonstration
Normal operation:
# Terminal 1
ros2 run action_demo navigate_server

# Terminal 2
ros2 run action_demo navigate_client
Cancel and resend:
# Terminal 1
ros2 run action_demo navigate_server

# Terminal 2
ros2 run action_demo navigate_client --ros-args -p cancel_and_resend:=true
Expected behavior for cancel and resend:
Client sends goal to (5.0, 3.0).
After 50% progress, client cancels and sends a new goal to (8.0, 6.0).
Second goal runs to completion.
Communication Pattern#
A summary to help decide when to use each ROS 2 communication mechanism.
Decision Guide
Mechanism |
Pattern |
Duration |
Feedback |
Example |
|---|---|---|---|---|
Topic |
Pub/Sub (1:N) |
Continuous |
N/A |
Sensor data, |
Service |
Req/Resp (1:1) |
Short |
None |
Spawn entity, compute IK |
Action |
Goal/Feedback/Result |
Long |
Periodic |
Navigate, pick-and-place |
Parameter |
Get/Set on node |
Instant |
Callback |
Tuning gains, thresholds |
Rules of thumb:
If data flows continuously and multiple consumers may need it, use a topic.
If you need a one-shot request with an immediate response, use a service.
If the task takes noticeable time and you need progress or cancellation, use an action.
If you are configuring node behavior without changing its code, use a parameter.